


Control Box Overview
The control box contains the display, keypad, speaker, rear power switch, Type-C charging jack, coil-cable connector and AUX headphone jack. It is the point where the device receives the coil signal, presents it visually and lets the operator change systems and settings.
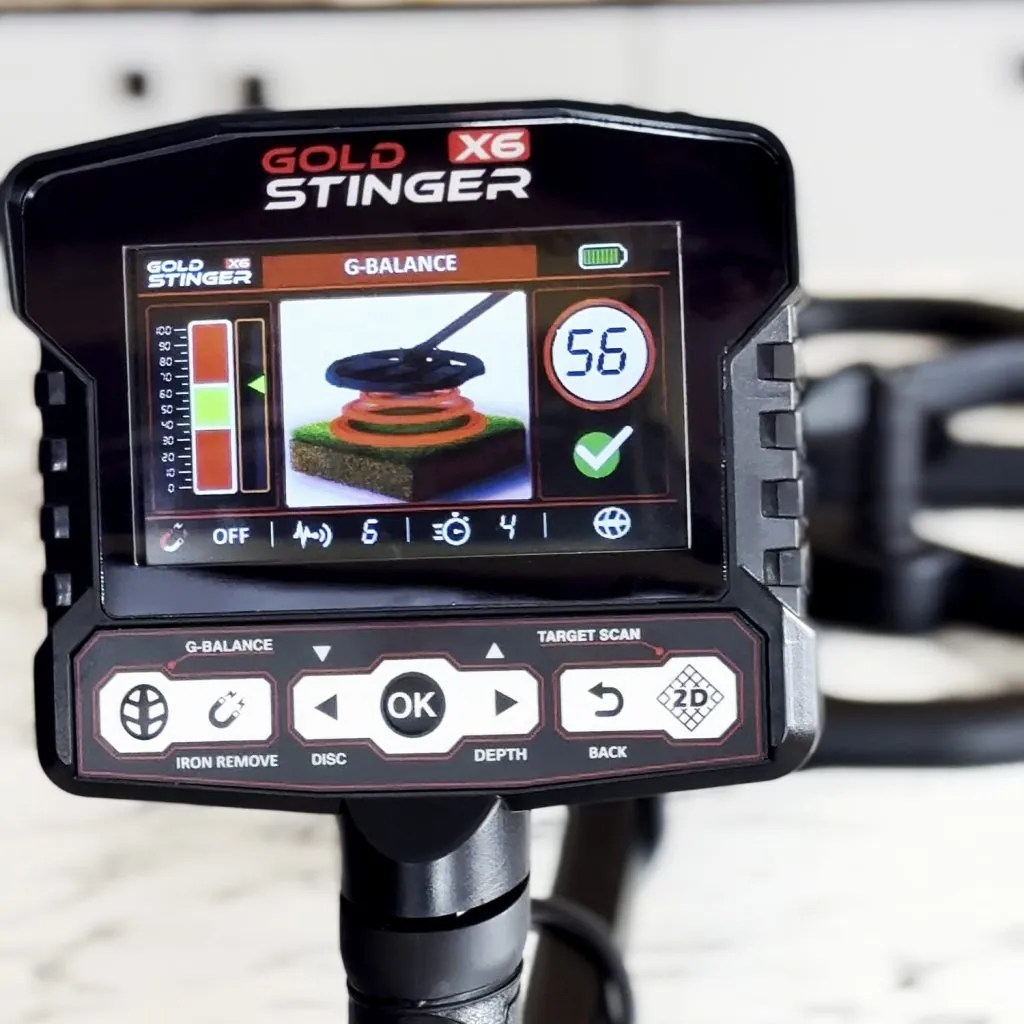
| Part | Purpose | Practical check |
|---|---|---|
| Display | Shows menus, values, graphs and status indicators | Set brightness for current light, not automatically to maximum |
| Keypad | Selects systems and changes options | Use clean dry fingers and avoid pressing with tools |
| Rear power switch | Starts and shuts down the device | Use after cable and coil checks are complete |
| Type-C charging jack | Accepts the supplied charging cable | Keep dry and use approved charging equipment |
| Coil connector | Receives the installed coil cable | Align and lock the plug before powering on |
| Speaker | Provides external audio feedback | Test at safe volume before field use |
| AUX jack | Connects compatible headphones | Insert fully and route cable clear of the coil |
Keypad Functions
The manual identifies seven primary keypad controls. A dedicated Ground Balance key opens calibration. A dedicated Iron Remove key changes iron filtering. Left and right arrows navigate and change values. OK/Enter confirms and starts procedures. Back returns to the prior screen. Target Scan has its own shortcut because it is normally used after a response has already been located.
| Control | Action | Use it when |
|---|---|---|
| Ground Balance | Enter calibration | At startup, after coil changes or when soil changes |
| Iron Remove | Toggle iron filtering | Compare an uncertain target in iron-contaminated ground |
| Left arrow | Move or reduce a value | Settings navigation and target-diameter input |
| OK/Enter | Confirm selection or start mode | Beginning a selected procedure |
| Right arrow | Move or increase a value | Settings navigation and target-diameter input |
| Back | Return one screen | Leaving a menu without random changes |
| Target Scan | Open guided scan workflow | Over a previously marked repeatable response |
Correct Startup Sequence
- Inspect the coil, cable, connector, shaft locks and battery condition.
- Choose GS30 or GS50 and make sure the coil connector is fully seated.
- Move outdoors to representative soil away from obvious metal and heavy electrical interference.
- Turn on the rear power switch.
- Wait for the startup progress display to complete.
- Confirm the coil-connectivity status before attempting to search.
- Complete Ground Balance when the calibration screen appears.
- Use OK to enter the main menu only after the balance result is acceptable.
- Select All Metals or another suitable system and begin with stable settings.
Do not skip Ground Balance to get to the main menu more quickly. The manual presents it as the first operational screen because incorrect calibration can create false signals and misleading classification.
Understanding the Startup Screen
Startup establishes that the control box, installed coil and basic electronics are communicating. It does not prove that every subsequent signal represents a valuable object. Treat a successful startup as a connection check, then let ground balance and field technique establish a stable reference.
If the device does not progress normally, do not repeatedly switch it on and off while moving connectors. Power down, inspect the coil cable and charging condition, reconnect carefully and restart. If an error remains, document the status screen and contact the authorized seller.
Ground Balance Is Part of Startup
After the startup bar finishes, the X6 directs the operator to Ground Balance. Use clean representative soil, maintain the manual’s approximate 5–10 cm coil relationship and follow the displayed motion. A green OK result indicates that calibration has completed; a Not OK result means the process should be repeated in a better location or with lower Sensitivity in difficult ground.
Ground Balance does not identify metal or guarantee depth. It reduces the ordinary soil response so that localized changes can be assessed with the selected search system. The full Gold Stinger X6 Ground Balance Guide explains the process in depth.
Using the Main Menu Without Losing the Search Plan
The main menu contains systems and settings. A common beginner error is changing several controls after every tone. Instead, decide the question before opening a menu: Do you need broad discovery, target classification, exact localization, depth estimation or a guided scan? Choose one system to answer that question, then return to the original search mode to confirm the result.
| Question | Starting choice | Next confirmation |
|---|---|---|
| Is there any metal response here? | All Metals | Cross-sweep and mark the center |
| Does the detector group it as ferrous or non-ferrous? | Discrimination | Return to All Metals if uncertain |
| Where is the strongest center? | Pin Pointer | Compare from two directions |
| What is the estimated depth? | Depth Detect | Verify boundaries before entering diameter |
| What does the guided visual scan show? | Target Scan | Repeat if path or height changed |
Settings You Reach Through the Controls
Volume and Brightness
The manual lists Volume and Brightness from 0 to 100. Volume should be high enough to hear subtle changes but not so high that shallow targets are uncomfortable. Brightness should be set for readability in the actual light. Extreme settings can increase battery use without improving detection.
Sensitivity
Sensitivity controls response strength. Higher values can improve response to small or weak signals but can also magnify mineralization and interference. The correct Gold Stinger X6 controls workflow is to ground balance first, then raise Sensitivity gradually until instability begins, and reduce it slightly to restore control.
Turbo
Turbo is a 0–100 boost control in the manual. It may enhance signal strength and depth-related response, but higher levels can use more battery and add noise. Test Turbo separately after Sensitivity is stable. Do not use maximum Turbo merely because the number is available.
Iron Remove
Iron Remove filters iron-oriented responses. It can reduce clutter, but a desirable target near iron may sound mixed or become less obvious. Use the shortcut as a comparison, then check doubtful targets with filtering off.
Language, Reset and Information
Language changes the interface language. Reset returns the device to factory values after confirmation and removes customized settings, so record useful profiles first. Information displays model, serial number, manufacturer and software version for support.
Reading the Status Bar
The manual describes a status bar that keeps four operating facts visible: Iron Remove condition, Sensitivity value, Turbo level and coil connectivity. Get used to checking it before interpreting a surprising response. An unexpected Iron Remove state can change target behavior; an unstable Sensitivity value can explain chatter; a coil connection error must be fixed before searching.
| Indicator | What to confirm | Action |
|---|---|---|
| Iron Remove | On or off matches your current test | Compare doubtful signals in both states |
| Sensitivity | Not above the stable site limit | Reduce if random noise appears |
| Turbo | Used deliberately rather than by habit | Lower if stability or battery life suffers |
| Coil connectivity | Connected status present | Power off and inspect if error appears |
Control Habits That Improve Accuracy
- Change one setting at a time and rescan the same position.
- Keep a written record of stable settings for each coil and soil type.
- Use Back rather than rapidly toggling menus when uncertain.
- Confirm a target’s location before entering Pin Pointer, Depth Detect or Target Scan.
- Use the speaker or headphones at safe volume; loudness is not sensitivity.
- Recheck the status bar after a coil change, reset or long break.
- Complete ground balance whenever the site conditions materially change.
A First-15-Minute Setup Routine
New operators often press through the screens quickly because they want to begin searching. A repeatable first-15-minute routine gives every later screen a useful context. It also makes it easier to recognize whether a problem began with power, the coil, ground conditions or a setting change. Perform this routine outdoors, away from obvious metal objects and vehicles, with the coil installed and cable secured.
- Inspect before powering on. Confirm that the coil connector is seated, the cable is not loose enough to strike the shaft, and the armrest and shaft locks are secure.
- Start and wait. Turn on the rear power switch and allow the loading sequence to finish rather than pressing keys during startup.
- Balance clean ground. Follow the Ground Balance display before searching. If the result is Not OK, change position and repeat instead of assuming the detector is faulty.
- Verify the status bar. Note coil connectivity, Sensitivity, Turbo and Iron Remove. These are the four settings most likely to explain a difference from yesterday’s response.
- Choose one search task. Start in a suitable search system, use a modest stable Sensitivity and make a few controlled sweeps over clean soil.
- Change one thing only. If you raise Sensitivity, leave Turbo and Iron Remove unchanged until you hear the result. This creates a useful cause-and-effect record.
| Site condition | Starting approach | What to observe | Next adjustment |
|---|---|---|---|
| Quiet, open soil | Complete balance; begin with moderate Sensitivity and Turbo | Stable background and repeatable responses | Raise one control gradually if stable |
| Mineralized or changing soil | Balance carefully; keep settings conservative | Whether noise changes as coil moves across ground | Rebalance or lower Sensitivity before increasing Turbo |
| Nearby electrical interference | Move away if possible; use a lower stable setting | Noise while coil is held still | Check cable and reduce Sensitivity/Turbo |
| Iron-contaminated ground | Search normally, then compare with Iron Remove | Whether a repeatable response changes materially | Rescan from two directions before deciding |
How the Controls Work Together
The settings are not independent promises of performance. Sensitivity affects how strongly the detector reacts; Turbo is an additional boost control; Ground Balance helps establish a reference for the soil; and Iron Remove changes how iron-related signals are handled. Raising several controls at once can make a site sound busy without making target interpretation better. A calm, repeatable response is more useful than a loud, unstable one.
For example, if a target-like chirp appears only after raising both Sensitivity and Turbo, first return Turbo to the previous level and sweep again. Then restore Turbo and return Sensitivity to its previous level. If the response disappears whenever either setting is reduced, treat it as uncertain and investigate with a different direction or a lower setting. This is a field comparison, not a guarantee of target identity.
Speaker, headphones and safe listening
The control box provides a speaker and an AUX headphone jack. Headphones can make subtle variations easier to hear in a windy or noisy location, but they do not add detection depth or turn a weak signal into a confirmed target. Test the speaker before plugging in headphones, ensure the connector is fully inserted and use a volume that preserves comfort and situational awareness. When testing a faint response, compare the same sweep through the same audio output rather than changing volume, sweep speed and settings together.
A Simple Controls Practice Exercise
Use a permitted test area with a few known metal items placed on the surface or in a test garden. Ground balance first. Sweep each item from two directions at a consistent coil height. Write down the status-bar settings and the response. Next, adjust only Sensitivity in small steps and repeat. Return to the original Sensitivity, adjust Turbo alone and repeat. Finally, compare Iron Remove on and off for an iron item and a non-iron item. The purpose is not to create a universal number chart; soil, target shape and distance change results. The purpose is to learn how your Gold Stinger X6 controls respond as one system.
| Record | Why it helps |
|---|---|
| Coil used: GS30 or GS50 | Each coil covers ground and responds to targets differently. |
| Ground condition and weather | Moisture and mineralized soil can alter stability. |
| Ground Balance result | Shows whether calibration was accepted before the comparison. |
| Sensitivity, Turbo and Iron Remove state | Makes a repeatable setup possible later. |
| Sweep direction and response repeatability | Helps separate a consistent signal from random chatter. |
When a Startup Problem Is Not a Menu Problem
Some issues should be addressed before changing menu settings. Do not force a connector, operate a damaged cable or expose the control box to conditions outside the care instructions. If the device does not charge or power on after using the supplied charging equipment correctly, or if the connector, screen or housing appears damaged, stop field use and contact the seller or manufacturer support with the model and information-screen details. A Reset cannot repair a physical connection, battery or charging fault.
Likewise, a stable display reading is not proof of target type, size or depth. Use the controls to establish a reliable search setup, then confirm a response through repeatable sweeps, a change of direction and recovery only where lawful and permitted.
Use Controls in a Consistent Order
When the detector sounds unstable, operators sometimes change Volume, Sensitivity, Turbo, Iron Remove and search system in quick succession. That makes it impossible to know which change helped. Use a fixed order instead: physical connection first, Ground Balance second, Sensitivity third, Turbo fourth, and filtering only as a comparison. Volume and Brightness are comfort settings; they make the interface easier to use but do not improve target depth or classification.
Make a small settings card for each common site. Write the coil, soil condition, accepted Ground Balance result and stable Sensitivity/Turbo range. On the next visit, begin with those notes, then make a fresh calibration. This is faster and safer than treating yesterday’s values as a permanent factory recommendation.
| Order | Check | Reason |
|---|---|---|
| 1 | Coil, cable and connector | Physical movement can create intermittent signals |
| 2 | Ground Balance | Soil reference may no longer match the location |
| 3 | Sensitivity | Lowering it slightly may restore repeatability |
| 4 | Turbo | Test its extra boost only after stability returns |
| 5 | Iron Remove / search system | Use filtering to compare a repeatable response |
Before Leaving for the Field
Prepare the X6 before arriving at the search location. Charge it with the supplied equipment, check the coil connector and cable, and pack the coil that matches the site. The smaller GS30 may be easier to use where room is restricted or targets are close together; the larger GS50 is suited to wider coverage in open ground. Once at the location, do not copy an old setting blindly. Confirm the coil status, perform Ground Balance and establish a stable Sensitivity and Turbo combination for that day’s conditions.
Keep a small notebook or phone note with the date, location type, coil, Ground Balance result and stable settings. You can later compare familiar sites without confusing a different coil or soil type with a device fault. The Information screen can provide model, serial number and software information if support is required.
Controls and Startup Troubleshooting
| Problem | Likely cause | Correct response |
|---|---|---|
| No power | Battery or charging issue | Use supplied charger and inspect charging connection |
| Coil error | Loose or misaligned connector | Power off, reconnect and restart |
| Ground Balance Not OK | Metal below coil, difficult soil or high sensitivity | Move, reduce sensitivity and repeat |
| Random tones | EMI, cable movement or excessive settings | Inspect cable, rebalance, lower settings |
| Weak audio | Low volume or headphone connection | Test speaker and headphones separately |
| Unexpected filtering | Iron Remove still active | Check status bar and compare response |
Gold Stinger X6 Controls FAQ
Which control starts Ground Balance?
Use the dedicated Ground Balance control and follow the on-screen calibration process.
Can I skip Ground Balance?
No. The manual directs users to balance before searching because soil response affects stability and classification.
What does the Target Scan shortcut do?
It opens the guided Target Scan workflow for a previously identified response.
Does higher volume improve depth?
No. Volume changes listening loudness, not the detector’s search field.
Should Sensitivity always be 100?
No. Use the highest stable setting for the coil and ground.
What is Turbo?
It is a power-boost setting that may strengthen response but can add noise and battery use.
What does the coil status indicator mean?
It shows whether the control unit detects communication with the connected coil.
Will Reset remove my settings?
Yes. Factory Reset erases custom values, so record useful settings first.
When should I use Iron Remove?
Use it to compare iron-contaminated responses, then check uncertain signals with it off.
Why does the display show Not OK at startup?
Ground balance did not complete; move to clean soil, adjust stability and repeat.
Conclusion
Gold Stinger X6 controls are most effective when used in sequence: secure coil, power on, verify connectivity, ground balance, choose one search question and make controlled setting changes. This prevents the operator from using display values or shortcuts without a stable reference.
Resources
- Gold Stinger X6 product page
- Official Device Startup video
- Official Gold Stinger X6 Complete Guide
- Gold Stinger X6 Complete Guide
- Gold Stinger X6 User Manual, English edition supplied with the device.