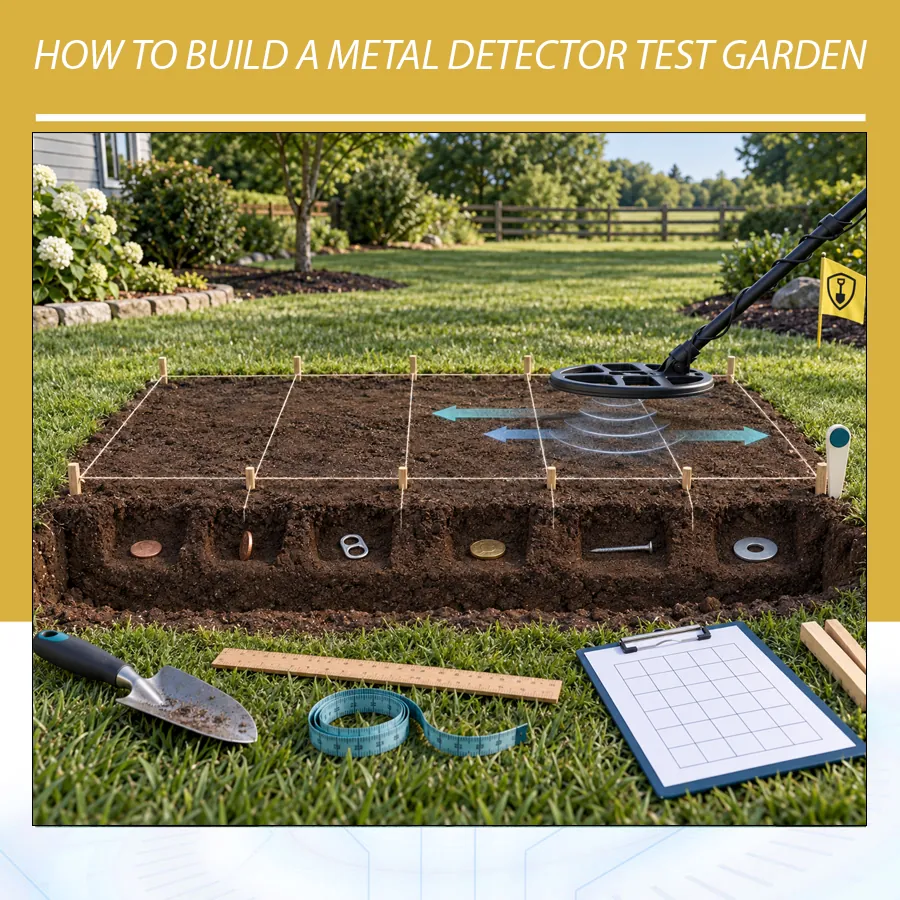
A useful garden is a controlled training tool. Every target should be safe, legal to bury, accurately measured, separated from neighbouring metal, and recorded on a map. The aim is to learn what your detector reports under specific conditions—not to manufacture an impressive depth claim. This guide explains how to choose a site, select targets, build the plot, establish a repeatable test procedure, and maintain records as the soil changes.
What a metal detector test garden can teach you
A test garden creates repeatable questions. Can you hear a small coin at this depth with the current coil? Does its Target ID remain stable from two directions? What changes when Recovery Speed is raised by one step? Can a smaller coil separate a non-ferrous target from a nearby iron object more clearly? How does the same target sound when the soil is dry and again after rain?
The plot has limits. It represents one set of targets in one type of soil. It does not reproduce every beach, goldfield, pasture, or iron-contaminated site. A result with one coil, software version, mode, and moisture level cannot be promoted as the universal maximum depth of the detector. Treat each result as an observation with recorded conditions.
| Test type | Best use | Main strength | Main limitation |
|---|---|---|---|
| Air test | Equipment checks, learning basic tones, and controlled comparisons | Variables are easy to control and targets can be changed quickly | It excludes soil, moisture, compaction, and ground balance |
| Test garden | Training in real soil and repeating settings or coil comparisons | Target identity, depth, and orientation are documented | It represents only that plot and can be affected by disturbed soil |
| Natural target | Making practical decisions at a real detecting site | Includes realistic ageing, ground, trash, and target distribution | The target and its exact position are unknown until recovery |
| Nail-board or surface separation test | Learning responses around closely spaced iron | Layouts and sweep directions can be repeated | A surface layout is not the same as three-dimensional soil |
Start with permission, safety, and a utility check
Use land you own or a place where the owner has clearly approved both the test plot and the permanent burial of the selected objects. Permission to detect does not automatically mean permission to build a garden. Public parks, protected sites, rented properties, communal gardens, and archaeological areas may prohibit excavation or leaving objects in the ground. Check local laws, property rules, and environmental restrictions before work begins.
Never assume that an apparently empty lawn is clear below the surface. Contact the local utility-location service before digging and follow its instructions, waiting periods, and marked exclusion zones. In the United States, the national 811 service advises contacting 811 before every digging project so buried utilities can be marked. Other countries have their own providers and legal procedures. Private lines such as irrigation, garden lighting, septic connections, or wiring after the utility meter may require a separate private locator.
Select a place away from overhead or underground electrical infrastructure, fences, reinforced concrete, buried pipes, vehicles, large metal sheds, and robotic-mower wires. These can produce interference or persistent responses. Inspect the surface for glass, sharp objects, animal burrows, roots, drainage features, and chemical treatment. Wear gloves and eye protection, use suitable hand tools, and stop if you encounter unknown material.
Choose representative, safe test targets
Choose objects that reflect what you search for and are safe to leave in soil. Good training sets may include modern clad coins, low- and high-conductive coins, a plain brass token, an aluminium pull tab, clean foil, a small iron washer, and a blunt iron nail. Jewellery practice can use inexpensive solid rings or purpose-made test pieces. Photograph, measure, and label each object before burial.
Avoid batteries, ammunition, explosive components, electronic waste, lead items, mercury-containing objects, pressurised containers, sharp rusty scrap, chemically coated material, or anything that can leak or fragment. Do not bury valuable historical artefacts. Avoid food containers that may attract animals. If local rules restrict leaving metal in soil, use removable test tubes or another approved reversible system, ensuring the container itself contains no metal and does not create an unrealistic large air void.
Targets should be stable enough to survive moisture without losing their identity. If corrosion itself is part of a long-term study, document that purpose and use material permitted in the location. Do not wrap targets in foil or plastic unless the wrapping is the variable being tested: foil is detectable, while thick packaging and large voids can change the soil environment around the target.
| Target | Learning purpose | Suggested orientations | Important note |
|---|---|---|---|
| Known modern coin | Baseline tone, Target ID, depth indication, and pinpointing | Flat and on edge in separate stations | Record diameter, thickness, composition, and year |
| Small brass token or button | Medium-conductor and small-target practice | Flat | Use a modern, non-historic object |
| Plain inexpensive ring | Learning that jewellery can overlap common trash responses | Flat and vertical | Record metal, mass, and dimensions |
| Aluminium pull tab | Comparison with overlapping non-ferrous targets | Flat | Clean it and remove sharp tears |
| Blunt iron nail | Ferrous tone, rejection, blanking, and iron-bias practice | Parallel and perpendicular to the sweep | Blunt or cover dangerous points securely |
| Coin beside iron | Target masking and separation practice | Fixed side-by-side layout | Build only after isolated targets are understood |
| Empty control station | Checking soil disturbance and false responses | No target | Prepare it like the target holes and map it clearly |
Survey the ground before burying anything
Scan the proposed area with the detector in an inclusive mode that reports ferrous and non-ferrous objects. Work from two directions and mark every response. A quiet surface does not replace a utility survey, but it helps avoid building above old nails, foil, wire, or landscaping debris that would compromise results. Remove ordinary shallow litter only when permission allows, and record anything that cannot be removed.
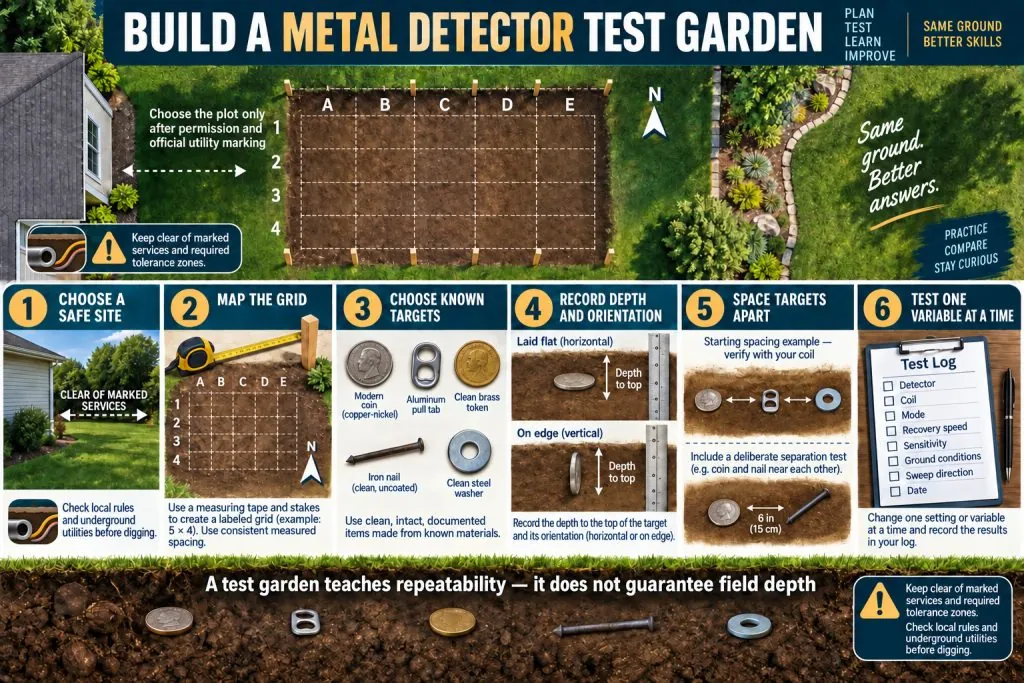
Leave enough room to approach every station from at least two directions without the coil crossing another target. Keep permanent metal markers, edging, screws, and labels outside the detection area. Use plastic survey flags temporarily, wooden stakes, painted stones at the plot boundary, or coordinates measured from fixed non-metal reference points.
Plan the layout before digging
Draw the plot on paper or in a spreadsheet first. Give each station a code such as C1 for a coin, I1 for iron, and CTRL1 for an empty control. Record the target, exact depth definition, orientation, distance from reference points, burial date, and any neighbouring target. Reserve extra spaces for future additions so you do not squeeze a new target between old ones.
Spacing depends on coil size, target size, depth, and the experiment. Garrett’s older GTP 1350 manual gives an example test plot with small items about 18 inches apart, but that figure should not be treated as universal. A large coil or a deep large target can respond farther from its centre. For isolated-target stations, test the intended spacing above ground first and increase it until each object can be swept without an audible contribution from its neighbour.
Create a separate masking lane if you want targets close together. Do not mix close-target exercises with the isolated depth lane, because the nearby iron or non-ferrous object changes the experiment. Orient rows so you can sweep both north–south and east–west. Leave a clear walking lane and enough room beyond each station for the coil to reach normal speed before crossing the target.
Measure depth and orientation accurately
Define depth consistently. For a thin coin, measure from the soil surface to the centre plane of the coin or clearly state that you measured to its top surface. For a larger object, record top, centre, and bottom depth if precision matters. A claim such as “25 centimetres deep” is ambiguous when the target itself is 12 centimetres tall.
Use a rigid ruler or tape held vertically from a straight reference spanning the undisturbed surface. Measure after positioning the target and before replacing soil. Photograph the measurement. Record units and avoid converting repeatedly between inches and centimetres, which invites rounding errors. Recheck the finished surface elevation because a mound that later settles changes the true distance.
Orientation matters as much as depth. A coin flat and parallel to the surface often presents a different response from the same coin standing on edge. A nail parallel to the sweep can behave differently from one crossed at 90 degrees. Use a small compass or a fixed plot axis and record the long-axis direction. For rings, note whether the opening is horizontal, vertical, or tilted.
Dig and refill without creating avoidable test errors
Cut a neat plug or excavate a narrow hole suitable for the target. Keep topsoil and deeper soil separate, and replace them in the original order. Remove all tools, jewellery, phones, marker pins, and loose metal before checking the station. A forgotten staple or fragment can invalidate years of observations.
Place the target in direct contact with the soil unless your experiment specifically studies an air gap or container. Hold flat targets in the intended orientation while gently returning a little soil around them. Do not force a vertical coin into place with a metal support. Compact the refill in layers only enough to restore a safe, even surface; extreme tamping can make the station unlike the surrounding ground.
Prepare the empty control hole with the same diameter, depth, soil separation, and refill method, but add no object. Its purpose is to reveal signals caused by missed contamination, changed soil structure, or operator expectation. Also retain one shallow control target that every correctly functioning setup should detect easily. If that target disappears, check the detector, battery, coil connection, EMI, and procedure before interpreting deeper results.
Map and label the garden without adding metal
A durable map is more useful than a forest of markers. Establish two fixed reference points outside the active sweep area, then measure each station from both points. Two distances allow the position to be reconstructed even if a surface flag moves. Include a scale, north arrow, boundary dimensions, target codes, and sweep lanes.
| Field | Example | Why it matters |
|---|---|---|
| Station code | C3 | Connects the physical location, map, photographs, and test log |
| Target description | 25 mm copper-alloy token, 7.4 g | “Coin” alone is too vague for comparison |
| Depth definition | 15 cm to target centre | Prevents top-versus-centre confusion |
| Orientation | Flat; face parallel to surface | Orientation changes detector response |
| Position | 2.10 m from point A; 1.65 m from point B | Lets you reconstruct a lost station |
| Burial conditions | Dry loam; 22 September 2026 | Creates a baseline for later seasonal comparisons |
| Neighbouring objects | No known metal within 1 m | Separates isolated-target tests from masking tests |
Allow soil disturbance and settling to remain visible in the records
A freshly buried target is not identical to an object that has rested in undisturbed soil for years. The hole contains loosened soil, changed moisture pathways, and sometimes air spaces. Garrett manuals have long advised recording test plots and testing again after soil settles, during drought, and after soaking rain. That is sound experimental practice, but it does not prove a simple or universal “halo effect.”
Run an initial test immediately because it documents the starting condition. Label it “fresh burial.” Repeat after a week, a month, and seasonally if practical. Record rain, irrigation, frost, drought, mowing, and soil movement. Do not silently replace an early result with a later, stronger one. The change is part of what the garden teaches.
Create a repeatable test protocol
Consistency matters more than producing the strongest possible signal. Begin with the detector’s current manual. Install the intended coil, check the battery, and record the software version when relevant. Perform Noise Cancel and Ground Balance as the manufacturer directs. Use a stable sensitivity setting and document the search mode, discrimination pattern, Recovery Speed or Reactivity, Iron Bias, threshold, audio theme, and any other control that affects response.
Mark a start line and keep coil height, sweep direction, sweep length, and approximate pace consistent. Approach the station from beyond the target so the coil is already moving normally. Make several passes, turn 90 degrees, and repeat. Define success before testing—for example, a repeatable audio response at the same location on at least three of four passes from each of two directions. Report Target ID separately from audio detection because a target may be audible before its numerical identity is stable.
Use blind or semi-blind trials when possible. A partner can select an unknown coded station or cover the surface markers while the operator records whether a target is present. This reduces the tendency to interpret any small sound as a detection when the target location is known. Include the empty control and easy shallow target in each session.
- Record date, soil condition, weather, detector, coil, battery, and software.
- Complete the documented startup, Noise Cancel, and Ground Balance procedure.
- Confirm the shallow control target and check the empty station.
- Set coil height and marked sweep path; avoid touching the surface.
- Make the predetermined number of passes from the first direction.
- Repeat from 90 degrees without changing settings.
- Record audio repeatability, Target ID range, depth indication, and confidence before revealing the station.
- Change only one variable, repeat the full sequence, and compare.
Change one variable at a time
If you change sensitivity, Recovery Speed, discrimination, coil, and sweep rate together, you cannot identify which change caused the result. Establish a baseline, alter one setting, then restore the baseline before testing another. Repeat the complete pass sequence rather than keeping only the best sweep.
For detector comparisons, use each machine according to its own manual and a stable, appropriate mode. Equal numeric sensitivity values across different brands are not equal physical sensitivity. A fair report can compare whether each machine meets the predeclared detection criterion with its listed settings; it should not imply laboratory equivalence.
Device examples from Orient Detectors
Minelab MANTICORE
The Minelab MANTICORE makes a useful advanced example because tests can record audio, numeric Target ID, and the two-dimensional Target Identification Map. Build isolated stations first, then a separate coin-near-iron lane to study how Ferrous Limits and Recovery Speed affect presentation. Keep the search mode and all audio settings fixed. A cleaner map trace or stronger number is not automatically greater detection depth; report audio repeatability and ID behaviour as separate observations.
Minelab EQUINOX 600/800
With an EQUINOX 600 or 800, use the garden to learn differences among the appropriate Park, Field, Beach, or Gold profiles available on the exact model without pretending they are interchangeable. Minelab’s EQUINOX 600/800 manual recommends outdoor target exercises and carrying a representative test target. The mode, operating frequency choice, recovery setting, Iron Bias, coil, and ground procedure belong in the log. Do not compare a dry-land station directly with a beach claim: conductive salt conditions are a different experiment.
Garrett ACE 400i
The Garrett ACE 400i is suitable for a clear beginner plot. Record its selected mode, sensitivity, Iron Audio state, Digital Target ID, and depth indication. Practise an inclusive mode over the nail and pull tab before trying discrimination patterns. The garden can show how coin orientation and nearby trash affect the display, while a separate air test helps establish the clean response away from soil.
Gold Stinger X6
The Gold Stinger X6 listing includes GS30 and GS50 search coils and multiple search systems. A test garden should treat every coil-and-system combination as a separate configuration. Use targets appropriate to the documented purpose of the selected system, record ground and sensitivity controls, and do not transfer a result from one system to all others. Wider coverage or a larger coil does not guarantee superior response to every small target or in every mineralised soil.
Air tests and ground tests answer different questions
Start with an air test if you want to confirm operation or learn how a known object responds without soil. Work outdoors away from metal and electrical interference, move the target with a non-metal holder, and keep target orientation and distance consistent. Air testing is fast and makes it easy to compare audio categories.
The garden then adds ground response, ground balance, moisture, compaction, and target depth. A newly buried target may be harder or simply different from its air-test response. That difference is expected. The detailed Orient guide to metal detector air tests vs ground tests explains why neither result should be presented as a guaranteed field depth.
A natural target remains the final practical test because it exists in the site you actually search, with unknown corrosion, adjacent objects, and undisturbed soil. Cross-checking air tests, a documented garden, and natural finds creates a better understanding than choosing whichever result produces the largest number.
Use the garden to learn, not to create false depth claims
Never report “this detector reaches 40 centimetres” from one garden response. State the target, measured depth definition, orientation, soil, moisture, detector, coil, mode, settings, sweep procedure, and detection criterion. “The 25 mm token at 20 cm produced repeatable audio from two directions in this dry loam with the listed setup” is useful. It does not promise the same result on a thin chain, small nugget, vertical coin, salty beach, or mineralised goldfield.
Do not bury successively larger objects at deeper stations and present the row as a detector depth scale. Target size and shape are part of the result. Likewise, a one-way chirp at a known location should not be edited into a confident four-way signal. Video comparisons should show full passes, settings, coil, ground procedure, and misses as well as successes.
Depth is only one performance dimension. A garden can test separation, Target ID stability, iron recognition, pinpointing, audio clarity, sweep-speed tolerance, and setup repeatability. In many real sites, correctly identifying a shallow target beside iron is more useful than hearing an isolated large object at maximum distance.
Records, maintenance, and seasonal checks
Keep one row per session in a spreadsheet or notebook. Include the station code and every detector variable that changed. Record observations as ranges: Target ID 46–51 is more honest than selecting the most attractive number. Use a simple confidence scale defined in advance, and leave room for comments about EMI, wind, wet grass, operator, and headphones.
Repeat a standard baseline session several times per year. Seasonal change is valuable data when the protocol stays constant. Back up maps and logs, keep product manuals with the records, and note firmware changes because processing or default settings may change. When ownership or permission ends, remove all targets if required and leave the ground safe.
Common mistakes to avoid
- Skipping utility checks: a clear detector sweep cannot certify safe digging.
- Using unknown scrap: composition, hazards, and corrosion become uncontrolled variables.
- Placing targets too close: neighbouring responses invalidate isolated depth tests.
- Forgetting orientation: “same coin, same depth” is incomplete if one lies flat and another stands on edge.
- Using metal markers: nails, wire, or marker stakes become unintended targets.
- Testing only at known positions: expectation can turn random noise into a claimed response.
- Changing several settings: the cause of improvement or decline becomes impossible to isolate.
- Ignoring fresh soil: a new hole does not reproduce an old, naturally buried target.
- Comparing unmatched detectors: the same menu number does not mean the same processing or sensitivity.
- Publishing a universal depth: the result applies to the recorded target and conditions.
Frequently asked questions
What is a metal detector test garden?
It is a mapped area containing known targets at recorded depths and orientations. It lets you repeat detector training and setting comparisons in real soil while knowing what each station contains.
How large should a test garden be?
There is no universal size. It must provide enough spacing that isolated stations do not interact with the coil being tested, plus room for normal sweeps from two directions. Test spacing before burial and keep close-target exercises in a separate lane.
How deep should targets be buried?
Use several realistic depths, beginning with targets that are easy to detect. Depth should match target size, detector type, soil, and training purpose. Do not make every station a maximum-depth challenge, and never use one plot to promise universal performance.
How far apart should test targets be?
Far enough that a sweep over one isolated station receives no response from another. Required distance changes with target size, depth, coil, and sensitivity. Above-ground spacing trials provide a starting point, followed by verification in the clean plot.
Can I use real coins and jewellery?
Yes, when legal and with the owner’s permission, but use inexpensive modern pieces whose composition and dimensions are documented. Avoid valuable, historic, hazardous, coated, or easily fragmented objects.
Should I seal targets in plastic?
Usually, direct soil contact is the simpler controlled condition. Packaging may create air gaps or change moisture. If containment is required by local rules, use an inert metal-free system consistently and record it as part of the test.
How long should the soil settle?
There is no magic period. Record a fresh-burial baseline, then repeat after weeks, months, and different seasons. Soil type, rainfall, compaction, vegetation, and climate all affect settling.
Is a test garden more accurate than an air test?
It is more representative of that soil because it includes ground effects. An air test remains better for isolating some variables and checking basic operation. The two methods answer different questions.
Can a test garden compare two detectors fairly?
It can support a documented comparison, but “fair” does not mean using identical numeric settings. Use each detector correctly, list its coil and settings, apply one detection criterion, repeat passes, and limit conclusions to that plot.
Why did a target response change after rain?
Moisture changes soil conductivity and the interaction between ground response and target signal. Depending on mineralisation, salt, target, and detector setup, the response may improve, weaken, or become noisier. Record the condition instead of assuming one universal effect.
What is the purpose of an empty control hole?
It helps reveal responses caused by disturbed soil, missed contamination, or expectation. Prepare it like the target holes, map it secretly if possible, and include it in blind trials.
Build a training tool you can trust
A reliable metal detector test garden begins with permission and safe-digging checks, then uses clean ground, intact documented objects made from known materials, accurate measurements, generous spacing, an empty control, and a reconstructable map. Its value grows through consistent testing and honest records rather than through a single dramatic depth result.
Build the first version simply. Revisit the same stations as moisture and soil condition change. When every observation includes the target, detector setup, ground, and success criterion, the garden becomes a practical classroom for audio, Target ID, pinpointing, separation, and careful field decisions.
Resources
- Orient Detectors: Metal Detector Air Tests vs Ground Tests
- Orient Detectors: Metal Detector Ground Balance Guide
- Orient Detectors: Metal Detector Target ID Explained
- Orient Detectors: Sweep Speed and Coil Height
- 811 Before You Dig — United States guidance
- Minelab EQUINOX 600/800 Instruction Manual
- Garrett ACE 350 Owner’s Manual: Test Plot Guidance
- Garrett GTP 1350 Owner’s Manual: Example Test Plot
- Minelab Product Manuals and Guides