Gold Stinger X6 Search Systems Explained: When to Use Each Mode
The Gold Stinger X6 is designed as a multi-system detector for prospectors who do not want to rely on one search style for every situation. In real fieldwork, the same location can contain surface trash, small raw gold, deep metallic targets, mineralized rocks, empty cavities, and mixed signals that change with soil type. That is why understanding the Gold Stinger X6 search systems is more important than simply turning the device on and walking across the land.
This guide explains the Gold Stinger X6 search systems in clear language, based on the official user manual supplied for the device and current product information available through Orient Detectors and Stinger Detectors resources. The goal is not to repeat the manual word for word, but to help users understand when to choose each mode, how to combine the modes during a real search, and which mistakes reduce performance.
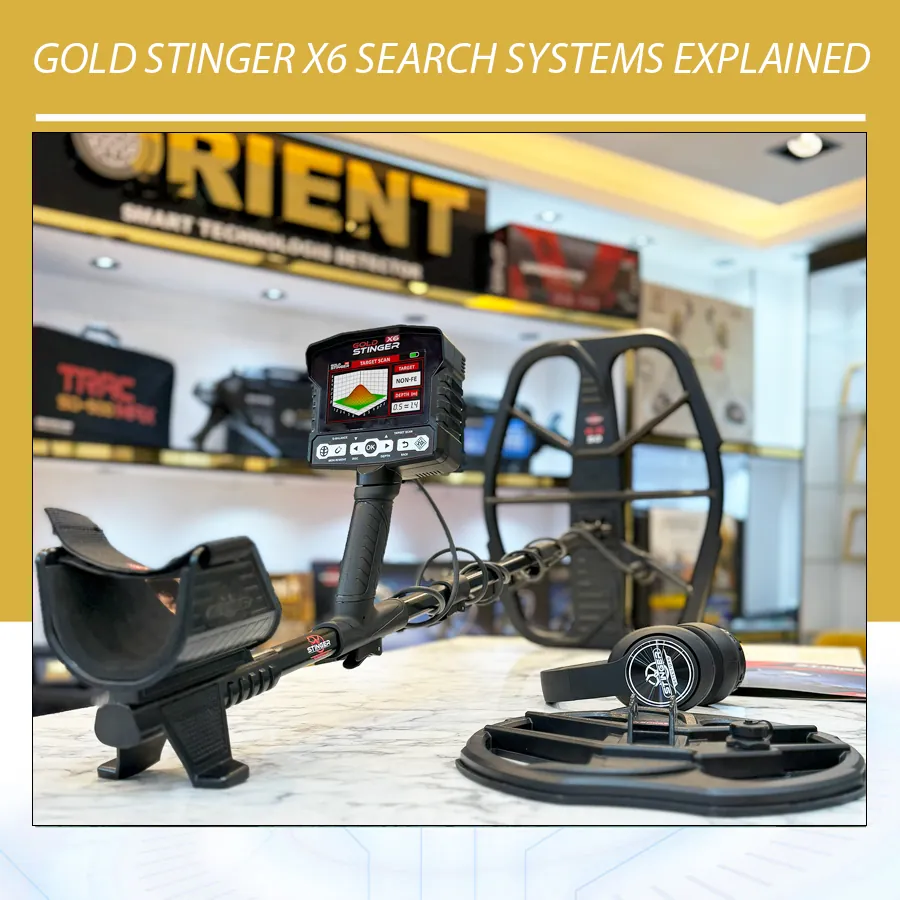
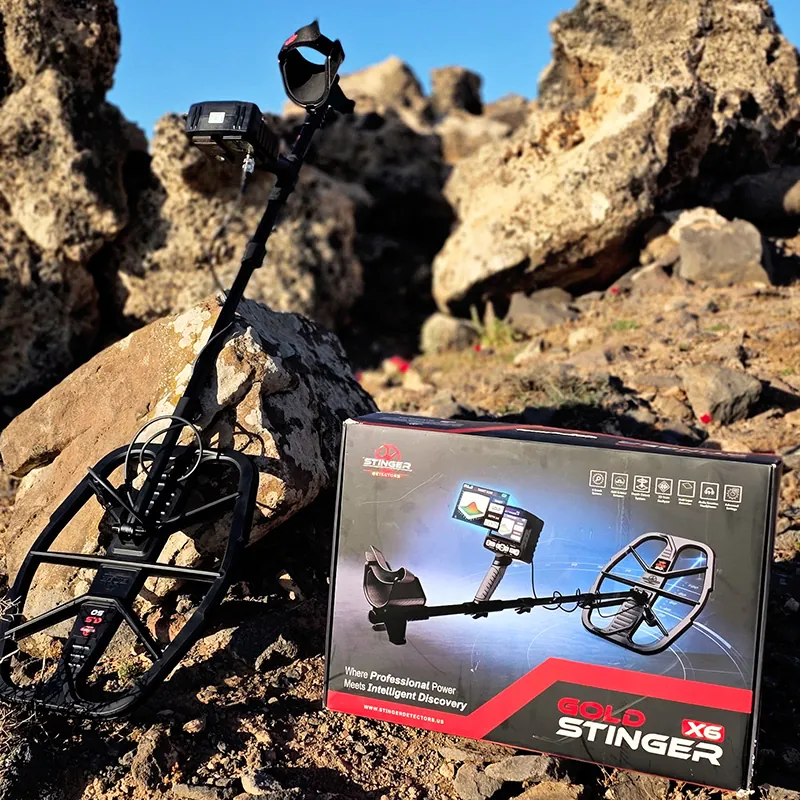
The Gold Stinger X6 search systems include Ground Balance, All Metals Mode, Pin Pointer, Discrimination Mode, Depth Detect, Cavity Test, and Target Scan. The product page describes the device as a professional metal detection system with six specialized detection systems, two search coils, adjustable sensitivity, Turbo power, numeric target identification, and visual scan tools. You can review the official product listing here: Gold Stinger X6 metal detector.
For a buyer or field user, the important question is simple: which system should I use first, and what should I do when the device gives a signal? The short answer is that you should start with proper Ground Balance, use All Metals for wide initial searching, switch to Discrimination when you need target classification, use Pin Pointer to narrow the exact location, use Depth Detect after defining the signal boundaries, and use Target Scan or Cavity Test when you need visual analysis or void indication.
Why the Gold Stinger X6 Uses Multiple Search Systems
A single metal detector mode can be useful, but it cannot answer every field question. A prospector may need to know whether a signal is metal or mineralization, whether the target is likely ferrous or non-ferrous, whether it is shallow or deep, whether it is small or large, and whether a blue cavity-type response should be checked separately. The Gold Stinger X6 search systems divide these tasks into separate tools so the user can move from discovery to confirmation.
This matters especially in gold prospecting. Raw gold is often found in difficult ground, including mineralized soil, hot rocks, dry desert soil, red soil, volcanic ground, and rocky terrain. External detector education resources such as Garrett’s guide to ground mineralization and metal detectors explain that mineralized soil can create false signals, reduce detection depth, and make target identification less stable. Minelab also explains that detector depth depends on target size, orientation, metallic content, ground minerals, conductivity, and surrounding noise in its metal detecting FAQ.
In practical terms, this means the Gold Stinger X6 search systems should be used as a workflow, not as isolated buttons. Each mode gives a different layer of evidence. If the same area responds strongly in All Metals, gives a useful non-ferrous or gold-range indication in Pin Pointer or Discrimination, shows a believable depth estimate, and presents a clear Target Scan response, the user has more confidence than from a single beep.
Quick Overview of the Gold Stinger X6 Search Systems
The following table gives a simple overview before we go deeper into each mode.
| System or Mode | Main Purpose | Best Used For | Field Note |
|---|---|---|---|
| Ground Balance | Calibrates the detector to the mineral content of the soil | Every search session before scanning | Repeat if the ground changes or signals become unstable |
| All Metals Mode | Detects ferrous and non-ferrous metals without filtering | Initial search, deep targets, wide coverage | Best for maximum response, but it will also react to unwanted metals |
| Pin Pointer | Finds the exact target center and displays numeric values | Confirming a signal before digging | Includes separate responses for metals and cavities in the manual |
| Discrimination Mode | Helps distinguish gold, precious metals, and non-precious metals | Trashy areas, iron-contaminated sites, target filtering | Ground balance errors and corroded steel can mislead readings |
| Depth Detect | Calculates approximate target depth after measuring signal boundaries | Digging decisions and excavation planning | Use after the target position and approximate diameter are defined |
| Cavity Test | Shows blue graph response for voids, rooms, tunnels, graves, and gaps | Checking possible cavities or hollow spaces | Brown graph response may indicate mineral-rich soil according to the manual |
| Target Scan | Visual scan analysis for target type, approximate size, and depth | Final signal analysis before excavation | Use over a target already found by another mode |
Start With Ground Balance Before Any Search Mode
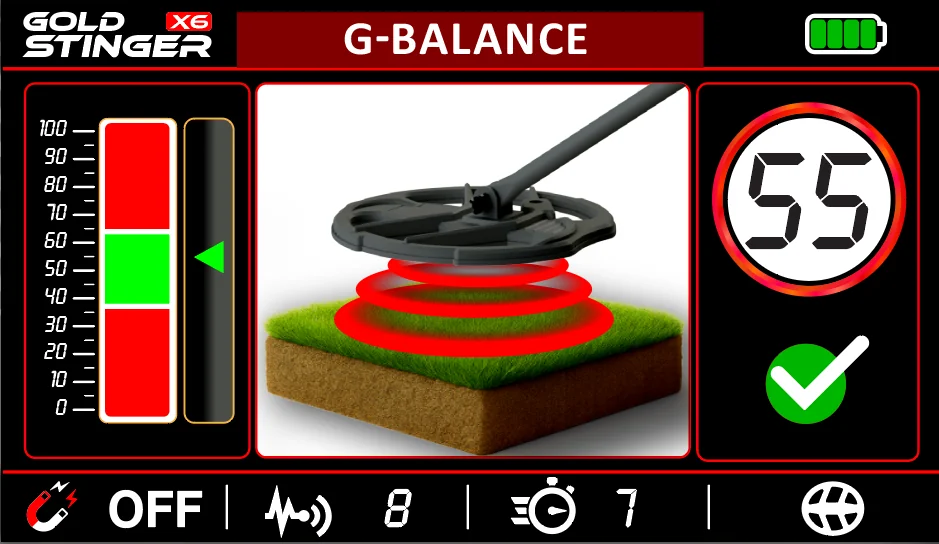
Ground Balance is the first step in the Gold Stinger X6 search systems workflow. The user manual states that the Ground Balance function calibrates the device to the mineral content of the ground. This reduces false signals, improves stability, and helps the detector reach better depth. The manual also makes the point very clearly: the user must perform this step before starting any search operation.
To balance the device, the manual instructs the operator to place the coil near the ground and move it up and down by approximately 10 cm until a calibration value appears. If the device shows a green OK message, the detector is balanced and ready. If it shows Not OK, the process should be repeated. This is not a small detail. It is the foundation for accurate work with the other Gold Stinger X6 search systems.
Ground balance is especially important in desert and goldfield areas because mineralized rocks and iron oxides can produce responses that sound similar to real targets. If the ground balance is wrong, the user may increase sensitivity or switch modes without solving the real problem. The result can be unstable audio, jumpy values, false signals, and poor depth.
Use this routine before serious scanning:
- Assemble the detector and choose the correct coil for the site.
- Move to a clean patch of ground away from obvious metal.
- Perform Ground Balance before selecting a search mode.
- Keep the coil movement steady and close to the manual’s recommended distance.
- Repeat the process after moving to a different soil type.
- If signals become noisy, unstable, or illogical, rebalance before changing other settings.
External resources from Garrett on ground balance and detector performance support this same principle: ground balance helps the detector filter mineral interference so it can focus on real targets. For Gold Stinger X6 users, this means proper balancing should come before judging any of the device’s deeper search functions.
All Metals Mode: Best for Initial Search and Maximum Response
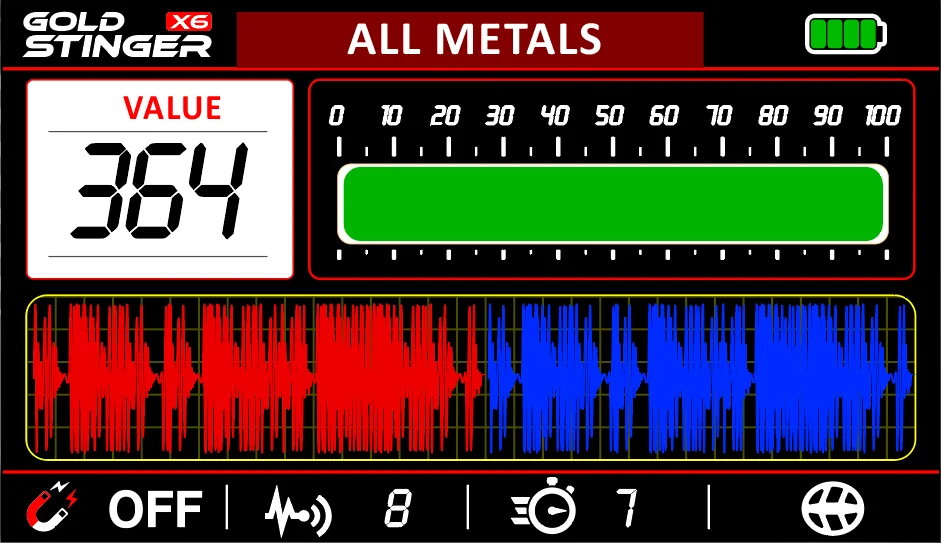
All Metals Mode is the broadest of the Gold Stinger X6 search systems. According to the manual, this mode detects all types of metal targets, including ferrous and non-ferrous materials. It is designed to provide maximum depth and sensitivity, making it ideal for general scanning and locating deeply buried objects.
Use All Metals Mode when you want the detector to react to everything metallic. This is useful when you are entering a new area and do not yet know what kind of targets are present. It is also useful when deep response matters more than filtering. If the goal is to locate possible buried metal before deciding whether it is valuable, All Metals Mode is the natural starting point.
All Metals Mode is especially helpful in open terrain, rocky desert areas, old paths, farms, abandoned places, dry valleys, and wide gold prospecting zones. It can also be useful when searching for larger buried targets because filtering is reduced and the detector can give a strong broad response. However, because the mode accepts all metals, it can also respond to iron scraps, nails, cans, wire, and other unwanted objects.
When to Use All Metals Mode
- Use it at the beginning of a search area to understand whether the ground contains targets.
- Use it when searching for deep metallic objects where maximum signal response is important.
- Use it in relatively clean areas where there is not too much modern iron trash.
- Use it when you do not want to miss a possible target because of filtering.
- Use it with the GS50 coil when you need wider ground coverage and better depth potential.
The user manual explains that the All Metals screen includes a numerical value, a value bar, a linear graph, and graph color indicators. Red indicates a metal target, while blue indicates a cavity or hollow space. This helps the user read more than a simple sound response. The graph behavior and value changes can tell you whether the signal is stable, repeatable, broad, narrow, strong, or weak.
For best results, keep the coil close to the ground and parallel to the surface. The manual recommends steady, controlled movement and wide, even sweep arcs, with each pass overlapping the previous one. Moving too fast, lifting the coil too high, or using uneven swings can cause weak or unstable responses. This advice applies across the Gold Stinger X6 search systems, but it is particularly important in All Metals Mode because the detector is open to a wide range of signals.
Discrimination Mode: Best for Separating Valuable Targets From Trash
Discrimination Mode is one of the most important Gold Stinger X6 search systems for areas with mixed targets. The official manual describes it as a mode that helps distinguish between gold, other precious metals such as copper and silver, and non-precious metals such as iron. The Orient Detectors product page also describes the Discrimination System as a way to distinguish ferrous and non-ferrous metals so users can focus on valuable targets while reducing unwanted signals.
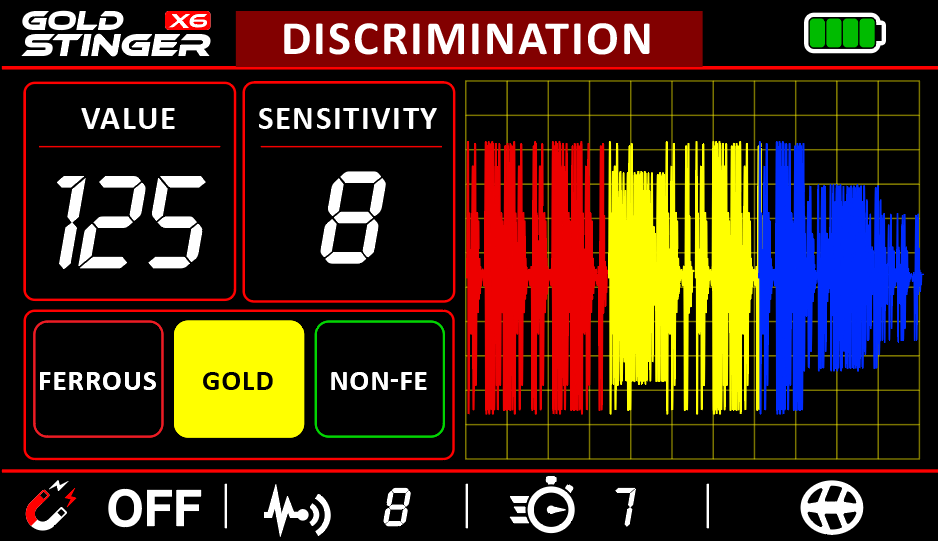
In simple terms, Discrimination Mode helps you decide what kind of target you may be dealing with. When the detector identifies signs of gold, the manual says it produces a distinctive sound and draws a yellow graph. When it identifies other precious metals such as silver, bronze, brass, ancient coins, or archaeological objects, it uses another sound and shows a green graph. When it identifies non-precious targets such as iron, nails, or tin, it uses a different response.
Discrimination is very useful, but it should not be treated as perfect. The manual warns that Discrimination Mode may give misleading signals because of corroded steel, chrome-plated metals, or incorrect ground balance. Garrett’s educational guide to metal detector discrimination explains a similar concept: discrimination helps filter unwanted targets, but high discrimination settings can sometimes risk missing low-conductivity valuable targets.
When to Use Discrimination Mode
- Use it after All Metals Mode finds a repeatable signal.
- Use it in trashy locations where iron and modern waste are common.
- Use it when searching for coins, jewelry, relics, and non-ferrous targets.
- Use it when you need to reduce unnecessary digging.
- Use it carefully in goldfields, because small gold and odd-shaped targets can produce less predictable responses.
The smartest approach is to use Discrimination Mode as a confirmation tool, not as the only search method. If a target sounds promising in All Metals but reads strangely in Discrimination, test it again from another direction. Rebalance if needed. Lower overly aggressive filtering. Check the target with Pin Pointer. In many real sites, target shape, corrosion, depth, and nearby trash can affect readings.
For gold prospectors, this is an important point. Raw gold is not always a smooth coin-shaped target. Nuggets can be small, rough, irregular, porous, or mixed with mineralized matrix. A user searching for raw gold should avoid rejecting too much too early. Discrimination Mode is valuable, but field discipline matters.
Pin Pointer Mode: Best for Finding the Exact Center of a Target
Pin Pointer is the precision tool inside the Gold Stinger X6 search systems. The manual describes this mode as a way to determine the exact location of a potential buried target. The device reaches its strongest sound when the search coil passes over the center of the target, and it translates the signal into changing digital values on the screen.
This mode becomes important after you detect a target in All Metals or Discrimination. A broad signal tells you something may be under the ground, but it does not always tell you exactly where to dig. Pin Pointer helps reduce the excavation area. That saves time, protects the target, and helps the user avoid digging large unnecessary holes.
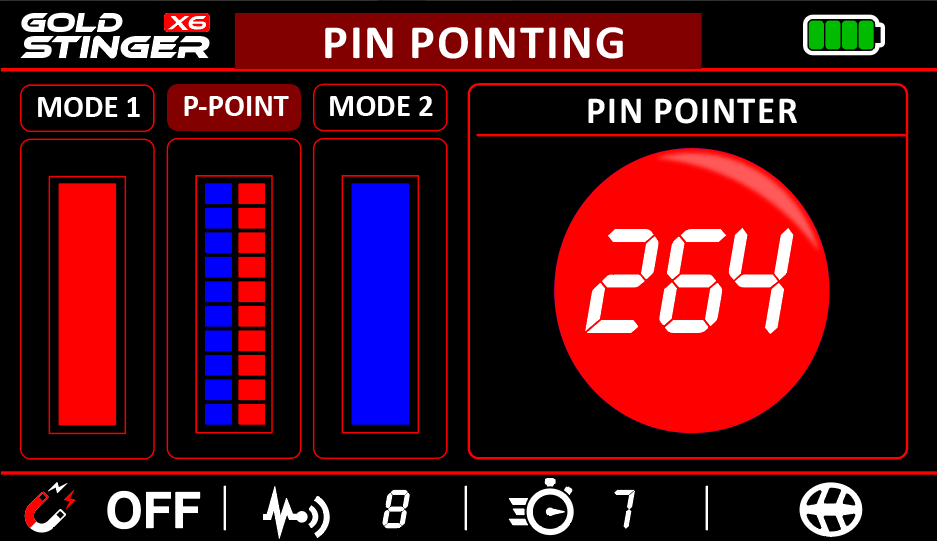
The manual also explains three Pin Pointer behaviors. Mode 1 focuses on metallic objects. The displayed numerical value increases when the metal object is larger or closer to the surface. Mode 2 is calibrated for cavities, hollow spaces, and low-density areas. The value increases when the cavity is larger or closer to the surface. A combined pinpoint mode can detect both metals and cavities when the OK button is held, which is useful when the target type is not yet known.
Pin Pointer Numeric Ranges
The manual gives useful value ranges for target categories:
- Non-precious metals in Pin Pointer mode: -50 to +30
- Gold targets: +30 to +60
- Precious metals: +60 to +90
These numbers should be treated as guidance rather than an absolute guarantee. Soil mineralization, target shape, depth, angle, nearby metal, and ground balance all affect readings. Still, the numeric ranges are helpful when used with repeatable audio and stable movement.
Use the Pin Pointer in short, controlled sweeps. Approach the signal from at least two directions. Mark the strongest point. Then rotate around the signal and test again. If the center shifts dramatically from one direction to another, the target may be elongated, irregular, close to another object, or affected by mineralized soil. If the center is stable from multiple angles, the target location is more reliable.
Depth Detect: Best for Planning the Dig
Depth Detect is one of the Gold Stinger X6 search systems that should be used after the user has already found and localized a target. The manual states that this mode is useful for determining the estimated depth of a potential buried target. The important word is estimated. No detector can guarantee exact depth in every soil condition, because depth readings are affected by target size, target orientation, soil minerals, conductivity, and electromagnetic noise.
The Gold Stinger X6 manual explains a practical field method. First, the user identifies the target location and type through previous detection modes. Then the user estimates the target diameter by marking the first point where the device picks up the signal and the opposite end of that signal. The process is repeated from the other side to form a square or rectangle around the target location. The estimated diameter is entered into the Depth Detect system, and the device calculates an approximate depth.
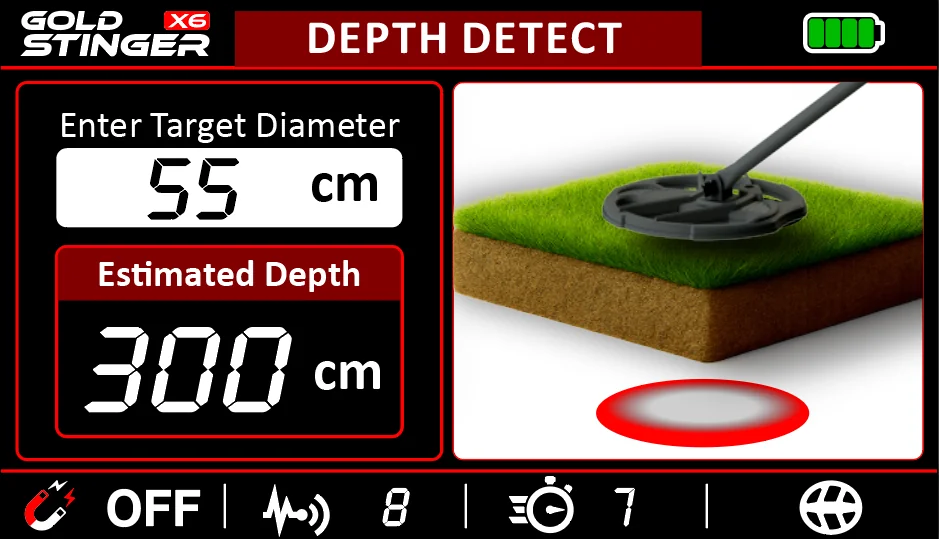
This method is useful because deep target work is different from surface digging. If the device suggests a shallow small target, the user can dig carefully and quickly. If the device suggests a deeper or broader target, the user can decide whether the signal is worth a larger excavation, whether more confirmation is needed, or whether the site conditions make digging practical.
When to Use Depth Detect
- Use it after confirming a target with All Metals, Discrimination, or Pin Pointer.
- Use it when the signal appears large enough to require planned digging.
- Use it before excavating in rocky, hard, or sensitive ground.
- Use it when comparing multiple targets and deciding which one to prioritize.
- Use it with realistic expectations, because depth is always approximate.
For a deeper explanation of why real-world depth varies, it is useful to read the Orient Detectors article on gold detector depth and real performance factors. That topic connects directly to Depth Detect because a displayed depth value is only as good as the quality of the signal, the correctness of the ground balance, and the user’s ability to measure the target boundaries carefully.
Cavity Test: Best for Voids, Tunnels, Rooms, and Hollow Spaces
Cavity Test expands the Gold Stinger X6 search systems beyond ordinary metal detection. According to the manual, when the device coil passes over gaps or unopened spaces such as rooms, tunnels, basements, and graves, the Gold Stinger X6 draws a blue 2D graph on the Cavity Test screen without producing sound. This is different from normal metal detection because the target is not always a metal object; it may be a low-density area or empty space under the ground.
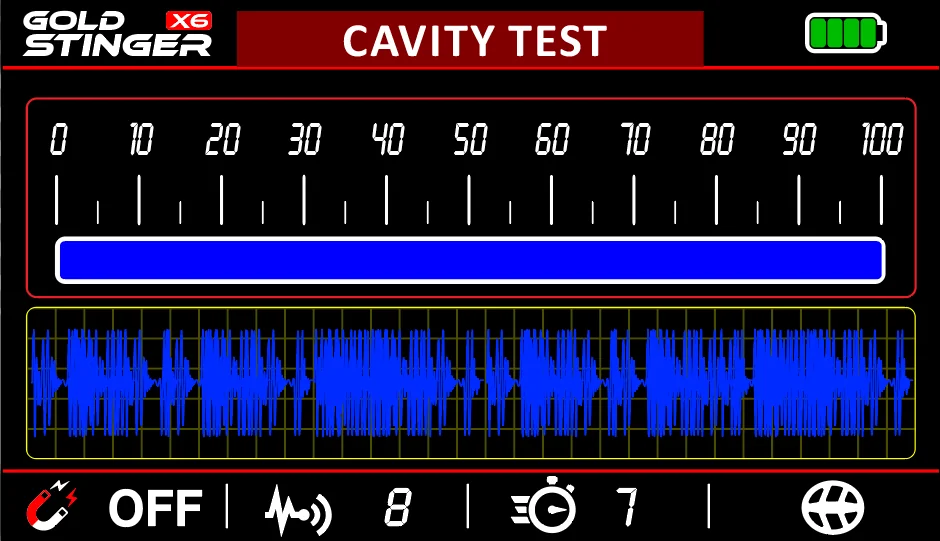
This mode is useful when the search objective includes buried cavities, old storage spaces, suspected underground rooms, archaeological voids, collapsed spaces, or tunnel-like anomalies. It can also help in locations where the user wants to understand whether a signal might be related to a void rather than a metal object.
The manual adds an important note: the Cavity Test feature may also help distinguish soils containing voids from mineral-rich soils. When the device detects mineral soil, a brown graph may appear without sound. This is a valuable detail because mineralized soil can confuse inexperienced users. A blue response and a brown response do not mean the same thing, and the user should learn to observe color, shape, repeatability, and location.
When to Use Cavity Test
- Use it when the search goal includes rooms, tunnels, basements, graves, or hollow spaces.
- Use it after a suspicious blue response appears in another screen.
- Use it in old settlement areas, ruins, rocky zones, and places with possible underground structures.
- Use it to separate possible void response from mineralized ground response.
- Use it slowly and repeat the scan from different directions.
Cavity work requires patience. Do not judge a possible void from one pass. Scan slowly, mark the start and end of the response, check whether the graph repeats from another direction, and compare the result with the terrain. Natural cracks, loose soil, rocks, buried debris, and mineralized areas can all affect readings. Cavity Test is most useful when it is part of a careful confirmation process.
Target Scan: Best for Visual Analysis Before Digging
Target Scan is the visual analysis mode among the Gold Stinger X6 search systems. The manual describes it as a system designed to analyze and display the type of target, its approximate size, and the likelihood of its presence. It is intended to be used over a suspected target that was previously identified by other systems.
This sequence is important. Target Scan is not the first step for covering a large area. It is a closer analysis tool. First you locate a possible target with All Metals or another search mode. Then you center and confirm the signal. After that, Target Scan can give a more detailed visual representation.
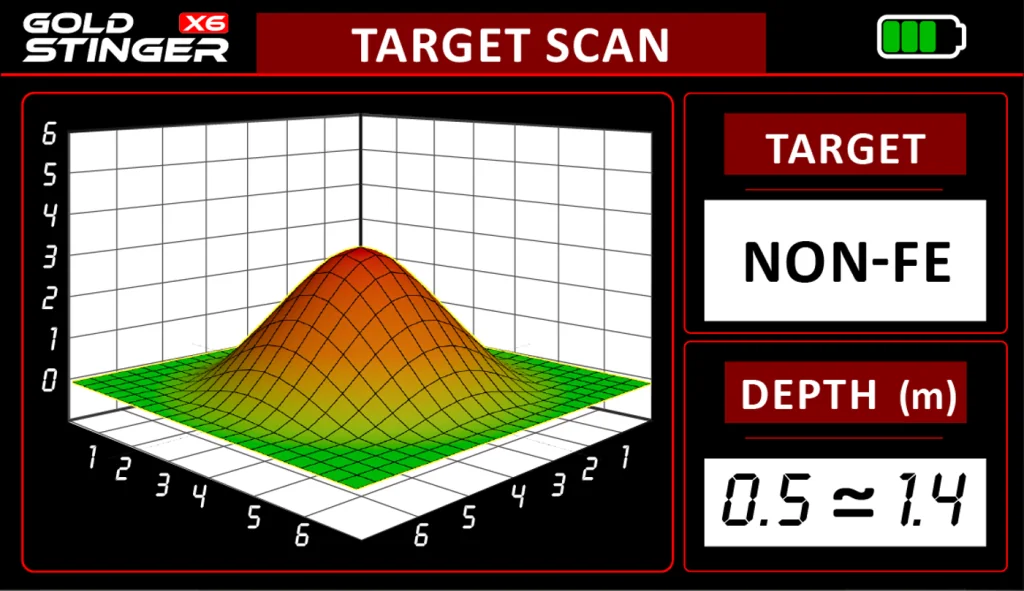
The manual explains that the screen shows the ground and the coil above it. When the user presses OK, an animation begins to show how the coil should move. The operator should copy that movement in real time and stop when the animation finishes. After the scan is complete, the system presents the analysis as a three-dimensional graph. If metal is present, the graph is displayed in red. The Target section indicates whether the signal corresponds to ferrous or non-ferrous metal, and the Depth section shows an approximate depth. The graph height changes depending on target size and distance from the surface.
When to Use Target Scan
- Use it after another mode has already detected a target.
- Use it before digging a signal that appears important or deep.
- Use it when you need a visual impression of target response.
- Use it to compare multiple promising signals in the same area.
- Use it with steady movement that follows the device animation.
Target Scan can be very useful for users who prefer visual information instead of relying only on sound. However, the quality of the scan depends on movement discipline. If the user moves too quickly, changes height, tilts the coil, or does not follow the animation, the graph can become less reliable. For best results, repeat the scan and compare the second result with the first.
Choosing Between the GS50 and GS30 Coils
The Gold Stinger X6 package includes two interchangeable search coils: GS50 and GS30. The manual describes the GS50 as the larger coil, designed for greater ground coverage and improved depth performance. It is ideal for open areas and deep-target searching. The GS30 is smaller and lighter, designed for enhanced sensitivity to small targets and better maneuverability in tight or cluttered environments.
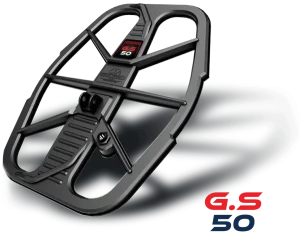
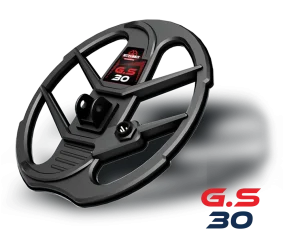
The coil you choose affects how the Gold Stinger X6 search systems feel in the field. A larger coil can help cover wide land faster and may give stronger response on larger or deeper targets, but it can be less convenient in rocks, bushes, holes, trashy places, and narrow spaces. A smaller coil can separate targets more easily and respond better to small objects, but it covers less ground per sweep.
| Coil | Best For | Recommended Modes | Practical Advantage |
|---|---|---|---|
| GS50 | Open land, deeper targets, wide scanning | All Metals, Depth Detect, Target Scan | More coverage and better depth potential |
| GS30 | Small targets, rocky places, cluttered ground | Pin Pointer, Discrimination, All Metals | Better maneuverability and target separation |
For raw gold prospecting, the GS30 can be useful when the target may be small nuggets or flakes near the surface, especially around rocks and narrow search zones. For deeper buried targets or wider survey areas, the GS50 is usually the more practical choice. A complete field workflow may involve scanning with the GS50 and then confirming the exact target location with the GS30.
For more background on coil selection, the Orient Detectors article Metal Detector Coils Explained is a helpful companion because coil size and shape strongly affect detection depth, separation, stability, and coverage.
Important Settings That Affect Every Mode
The Gold Stinger X6 search systems do not work in isolation from the device settings. The manual lists settings such as language, sound, brightness, sensitivity, Turbo, Iron Remove, reset, and information. For search performance, the most important practical settings are Sensitivity, Turbo, and Iron Remove.
Sensitivity
Sensitivity controls how responsive the detector is to signals. The manual explains that higher sensitivity increases depth and responsiveness but may also increase noise. This is exactly why beginners should avoid turning sensitivity to maximum in every location. In mild soil, higher sensitivity can help. In mineralized ground, trashy locations, or areas with electrical interference, very high sensitivity can create unstable readings.
A good habit is to start with a moderate sensitivity level, test the detector’s stability, then increase gradually. If the detector becomes noisy, reduce sensitivity slightly and rebalance. A quiet and stable detector often finds more real targets than an unstable detector running too aggressively.
Turbo
The manual describes Turbo as a power boost that can enhance detection depth, with adjustable levels from 0 to 100. Higher Turbo settings may improve depth but consume more battery. Turbo is best used when the signal is weak but repeatable, the ground is reasonably stable, and the user wants stronger deep response.
Do not use Turbo as a replacement for good technique. If the coil is too high, ground balance is wrong, or sensitivity is already unstable, Turbo may amplify problems. Use it after the device is properly balanced and the signal deserves deeper investigation.
Iron Remove
Iron Remove toggles iron discrimination. When ON, the detector filters iron signals to reduce clutter. This can be very helpful in places with nails, old building debris, rusted fragments, and common trash. It can save time and reduce unnecessary digging.
However, if you are searching a historical site where iron objects may also be meaningful, or if you are dealing with mixed targets, use Iron Remove carefully. For raw gold, do not depend only on aggressive filtering. Check repeatable signals with more than one mode when possible.
Recommended Field Workflows
The best way to use the Gold Stinger X6 search systems is to follow a consistent workflow. The right workflow depends on your search goal.
Workflow 1: Raw Gold Prospecting
- Choose GS30 for small targets or GS50 for wider land and deeper response.
- Perform Ground Balance carefully on clean ground.
- Start with All Metals Mode to avoid missing weak gold responses.
- Keep sensitivity stable rather than extreme.
- Use Pin Pointer to locate the exact center of repeatable signals.
- Check the numeric range and audio response, especially the gold target range described in the manual.
- Use Target Scan if the signal is strong enough for visual analysis.
- Dig carefully and recheck the hole and removed soil.
This workflow is suitable for prospectors in dry valleys, rocky hills, gold-bearing desert terrain, and mineralized soil. For more buying and field context, see best gold detectors for desert prospecting and gold detectors for mineralized soil.
Workflow 2: Coins, Relics, and Mixed Metal Sites
- Start with Ground Balance.
- Use All Metals Mode for a quick overview if the site is not too trashy.
- Switch to Discrimination Mode to classify repeatable targets.
- Use Iron Remove if iron trash is heavy, but avoid over-filtering in relic sites.
- Use Pin Pointer to reduce the digging area.
- Use Depth Detect when the target appears broad or deep.
- Compare tone, number, graph behavior, and repeatability before digging.
In these sites, target separation and interpretation matter more than maximum depth alone. A rusty nail near a coin can change the response. A corroded object can sound better than it is. Discrimination helps, but user judgment remains essential.
Workflow 3: Deep Buried Objects
- Use the GS50 coil for wider coverage and depth potential.
- Perform Ground Balance before the search and repeat it if the ground changes.
- Use All Metals Mode to locate broad or deep responses.
- Mark the boundaries of the signal from multiple directions.
- Use Depth Detect after estimating the target diameter.
- Use Target Scan to view the target response and approximate depth.
- Confirm with shorter sweeps and avoid rushing into excavation.
This workflow is useful for deep targets where digging effort is high. It helps separate a casual signal from a target that deserves time and labor.
Workflow 4: Cavities and Voids
- Ground balance the device carefully.
- Use All Metals or Pin Pointer combined behavior if the target type is unknown.
- Switch to Cavity Test when a void or hollow space is suspected.
- Watch for a blue graph response for gaps and hollow spaces.
- Watch for brown graph behavior that may indicate mineral-rich soil.
- Scan the area from at least two directions.
- Mark boundaries and compare with the visible terrain.
Cavity interpretation should be careful and conservative. Natural geology can produce complex responses, and no single pass should be treated as final evidence.
Common Mistakes When Using the Gold Stinger X6 Search Systems
Many performance problems come from small field mistakes rather than from the detector itself. The most common mistake is skipping Ground Balance. If the detector is not calibrated to the soil, the other modes become harder to trust. False signals, weak depth, and unstable readings often start here.
The second mistake is using one mode only. The Gold Stinger X6 search systems are meant to complement one another. All Metals gives maximum response, Discrimination classifies, Pin Pointer centers, Depth Detect estimates depth, Target Scan visualizes, and Cavity Test checks voids. Using them together creates better decisions.
The third mistake is swinging too fast or lifting the coil too high. The manual emphasizes steady movement, wide even arcs, overlapping passes, and keeping the coil close and parallel to the ground. This is basic technique, but it has a major effect on signal quality.
The fourth mistake is overusing sensitivity or Turbo. More power is not always better. In mineralized ground, high sensitivity can create more noise and less confidence. Use strong settings when the detector remains stable.
The fifth mistake is trusting discrimination blindly. Corroded steel, chrome-plated metals, nearby iron, and incorrect ground balance can mislead the device. Test targets from different angles and compare more than one mode.
Best Mode by Search Scenario
| Search Scenario | Start With | Confirm With | Recommended Coil |
|---|---|---|---|
| Raw gold in rocky terrain | Ground Balance + All Metals | Pin Pointer + Target Scan | GS30 for small gold, GS50 for wider areas |
| Deep buried metallic target | Ground Balance + All Metals | Depth Detect + Target Scan | GS50 |
| Coin or relic hunting | Ground Balance + Discrimination | Pin Pointer + Depth Detect | GS30 or GS50 depending on site size |
| Trashy ground with nails | Ground Balance + Discrimination | Iron Remove + Pin Pointer | GS30 |
| Possible tunnel or chamber | Ground Balance + Cavity Test | Target Scan and repeated passes | GS50 for coverage, GS30 for boundaries |
Final Buying and Usage Advice
The Gold Stinger X6 search systems make the device flexible for more than one type of user. A beginner can start with Ground Balance, All Metals, and Pin Pointer, then gradually learn Discrimination, Depth Detect, Target Scan, and Cavity Test. A more experienced prospector can build a full confirmation workflow using all modes before digging important signals.
The strongest advantage of the Gold Stinger X6 is not simply that it has multiple modes. The real advantage is that each mode answers a different field question. Is there a signal? Use All Metals. What category might it be? Use Discrimination and Pin Pointer values. Where is the center? Use Pin Pointer. How deep might it be? Use Depth Detect. What does the response look like visually? Use Target Scan. Could it be a cavity or void? Use Cavity Test.
For users comparing different detector technologies before buying, the articles Pulse Induction vs VLF Metal Detectors and Gold Detector Buying Guide can help place the Gold Stinger X6 in a wider buying context. But for owners of this device, the most important step is practice. Test known targets, learn the sounds, compare graphs, repeat scans, and keep a notebook of real field responses.
When used correctly, the Gold Stinger X6 search systems can support gold prospecting, coin hunting, relic searching, deeper metallic target detection, and cavity investigation. The device gives the user multiple ways to read the ground. The final result depends on choosing the right mode at the right time, balancing the device properly, using the correct coil, and confirming important signals before excavation.
Frequently Asked Questions
What is the best Gold Stinger X6 mode for raw gold?
For raw gold, start with Ground Balance and All Metals Mode, especially if you do not want to miss weak or small targets. Then use Pin Pointer to center the signal and check the numeric response. For small raw gold, the GS30 coil may be more practical; for wider and deeper searching, the GS50 coil can be useful.
Should I use Discrimination Mode all the time?
No. Discrimination Mode is useful for filtering and classification, but it should not replace All Metals in every situation. In difficult goldfields or mineralized soil, valuable small targets can produce less predictable readings. Use Discrimination as a confirmation tool and compare it with other modes.
How accurate is Depth Detect?
Depth Detect provides an approximate depth, not a guaranteed exact measurement. Accuracy depends on how well you define the target boundaries, the size and shape of the target, soil mineralization, ground balance, and signal stability.
What does a blue graph mean?
In the manual, blue graph behavior is associated with cavities or hollow spaces. In Cavity Test, the device may show a blue 2D graph when passing over gaps, rooms, tunnels, basements, graves, or similar voids. Repeat the scan from different directions before making a decision.
What is the difference between GS50 and GS30?
GS50 is the larger coil, best for wide coverage and improved depth performance. GS30 is smaller and lighter, better for small targets, tighter spaces, and cluttered ground. Many users benefit from using both during the same search session.
Resources
- Orient Detectors: Gold Stinger X6 product page
- Stinger Detectors: Gold Stinger X6 overview and coil information
- Garrett: Ground mineralization and metal detectors
- Garrett: Ground balance explained
- Garrett: Understanding metal detector discrimination
- Garrett: How to read a metal detector
- Minelab: Detecting in mineralized soils
- Minelab FAQ: Detector depth and ground balance considerations
- Gold Stinger X6 User Manual, .