
Gold Detecting Tips: Read the Ground and Find Better Targets
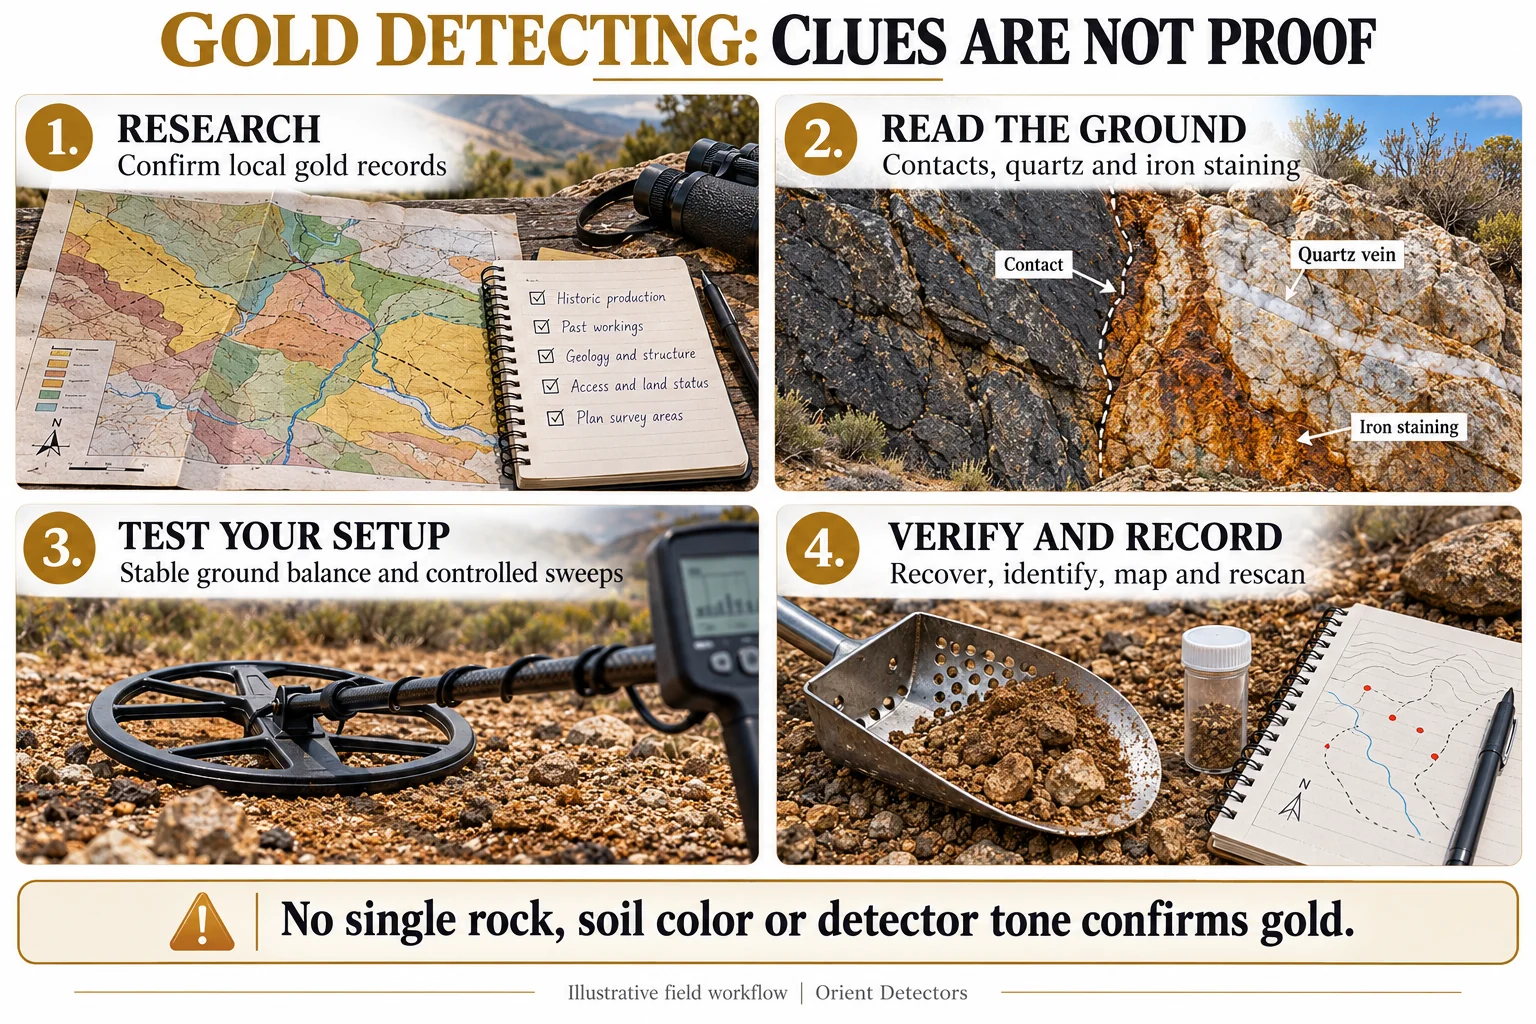
The most useful gold detecting tips connect local geology with controlled detector operation. Start where credible records show natural gold, learn which features matter in that district, and test your equipment over representative ground. Then search defined blocks, investigate uncertain signals carefully, and record what you actually recover.
A quartz vein, red soil, or black-sand streak can help you decide where to investigate, but none proves that gold is present. A strong detector response is also an indication rather than a material identification. Better decisions come from combining independent evidence instead of trusting one attractive clue.
This guide brings practical beginner advice together with geology, contact zones, natural indicators, changing ground conditions, and advanced field comparisons. It focuses on detectable natural gold, including nuggets and some specimens. Fine gold dispersed through sediment or rock may require methods beyond a handheld detector.
Gold Detecting Tips at a Glance
| Priority | Practical action | Avoid assuming |
|---|---|---|
| Site evidence | Check documented gold occurrences and accessible surface material | Every nearby creek contains detectable nuggets |
| Local geology | Compare mapped rock units with known mineralized locations | One rock type is universally gold-bearing |
| Ground handling | Establish stable operation on suitable reference ground | Maximum sensitivity gives the best usable result |
| Coverage | Use controlled lanes and overlapping passes | A casual walk equals a completed search |
| Target checking | Repeat, localize, recover where permitted, and identify | A tone or target number proves gold |
| Follow-up | Record finds and expand the search in manageable blocks | One nugget proves a rich or continuous deposit |
Keep these priorities in order. Better settings will not solve an unsuitable site, and better geology will not solve uncontrolled coverage. Decide which part of the process needs improvement before buying accessories or extending your search area.
1. Research Known Gold Areas and Interpret Old Workings
Ask what kind of gold was found
Look for geological surveys, mining reports, historical production records, and reliable recovery information. Establish whether the district produced coarse placer gold, gold-bearing specimens, or fine gold within mined rock. A productive mine can be a poor detector destination if its gold was finely dispersed or occurred far below accessible ground.
Make a short site brief before travelling: the evidence source, likely target form, surface cover, access restrictions, and the feature you intend to test. This turns a broad reputation into a specific field question. Keep uncertain information marked as uncertain rather than letting repetition turn it into a fact.
Read disturbance without inventing its history
Old pits, spoil heaps, dry-processing residues, and disturbed gravel can identify places worth researching. However, an unusual rock pile could also be road material, construction waste, or agricultural clearance. Its presence does not establish discarded gold ore or a forgotten transport accident.
Compare the disturbance with maps, photographs, and visible landforms. Where access and disturbance are permitted, inspect a small defined area before committing a full day. Record whether the responses came from natural material or obvious mining rubbish.
Previously worked ground may contain missed targets, but it may also be depleted, inaccessible, or unsuitable for your equipment. Avoid the claim that every old mining area will still produce gold. Search quality and actual evidence should determine whether a return visit is justified.
Check ownership, applicable claims, permissions, and detecting rules before entering. Access to a track does not automatically authorize prospecting or excavation. Keep clear of unstable workings and open shafts; historical value does not make a disturbed site safe.
2. Geology and Contact Zones: Learn the Local Pattern
What is a geological contact?
A contact is a boundary between different rock units. A dyke is a sheet-like igneous body that cuts existing rock; its margins form contacts. An intrusion is a broader category of igneous body. These terms describe related geological features, but they are not interchangeable.
Some gold deposits are associated with structures, fractures, alteration, or contrasts between rock units. That makes locally relevant boundaries worth investigating. It does not make every contact gold-bearing, and a visible color boundary alone does not establish the position or origin of a contact.
Look for structural context
Ask how veins, faults, and altered rock relate to known gold in the district. In certain gold systems, structures influence where fluids moved and mineralization developed. The USGS low-sulfide quartz gold model discusses structural controls while emphasizing that mineralization is unevenly distributed. Its context is a particular deposit type, not a rule for every goldfield.
Your practical task is comparison. Does the feature resemble one described near verified local workings? Is it exposed clearly enough to map? Can you distinguish the original rock from loose transported fragments? Use photographs and notes to connect observations with a geological map instead of identifying a deposit from one stone.
Do not rely on a universal rock list
Granite, schist, gneiss, volcanic rocks, and sedimentary units occur in many environments. Their names alone do not establish a useful gold target. Learn which units, structures, and alteration patterns matter in your district and which similar-looking materials are common but unproductive.
Likewise, a quartz vein can be barren. A USGS study of the Pogo deposit describes differences between widespread barren quartz and localized mineralization. The field lesson is to seek context and supporting evidence rather than equating white rock with gold.
Translate geology into a search question
Suppose a district report associates recoveries with a particular vein-bearing unit. You find a similar exposed unit beside shallow loose material. A useful hypothesis is that the accessible surface merits a controlled test. It is not that the boundary must contain nuggets.
Search a manageable block and compare adjacent material where lawful access allows. Record the ground response, recoveries, and coverage quality on both sides. If the results do not support your hypothesis, revise it. A geological interpretation should guide investigation and remain open to correction.
3. Natural Gold Indicators: Compare Clues with Evidence
The strongest gold detecting tips distinguish a useful observation from proof. Geological clues help prioritize work, but each has alternative explanations. Look for several relevant observations together, supported by credible local records.
| Observation | Why investigate? | What it cannot prove | Useful follow-up |
|---|---|---|---|
| Quartz veins or fragments | Some local gold systems involve quartz veins | That all quartz contains gold | Compare host rock, structure, and documented occurrences |
| Iron staining or rusty material | May help identify weathered mineralized material in the right setting | Gold presence or concentration | Check the local geological interpretation |
| Soil-color boundary | May mark a material change worth mapping | A buried contact, intrusion, or gold vein | Inspect exposures and distinguish natural from disturbed soil |
| Black-sand concentration | Heavy-mineral concentration can provide placer context | Detectable nuggets or an economic deposit | Relate it to gold records, terrain, and ground response |
| Bedrock cracks and shallow gravel | Potential traps or accessible search surfaces | That every crack holds gold | Test controlled blocks and record outcomes |
| A recovered gold piece | Direct evidence of gold at that recovery location | The size or direction of a wider deposit | Verify identity, map it, and expand systematically |
Read color changes cautiously
Red, brown, pale, or dark material may reflect different rock, weathering, drainage, or transported cover. A red band should not automatically be described as an old iron intrusion. Sketch its extent, photograph nearby exposures, and compare it with a map or professional geological description.
Disturbance matters. A roadside color change could be imported fill. A hillside band could be loose material moved downslope. Before following a line for hours, check whether the feature persists in undisturbed exposures and whether its interpretation matches the district.
Use nugget texture as a clue, not a distance meter
A rounded piece and an angular specimen may suggest different histories, but appearance alone cannot determine transport distance or locate a source vein. Grain shape, original form, and later modification complicate the interpretation. Photograph texture before cleaning and record the recovery setting.
If several verified finds occur, compare their distribution and character alongside terrain and geological observations. Do not automatically follow a single rough nugget uphill or a smooth nugget upstream. Test plausible directions with recorded coverage and keep alternative explanations available.
4. Ground Conditions: Match the Response to the Problem
Mineralization, hot rocks, and salt differ
Ground conditions affect how clearly you can recognize a target. Mineralized soil can create background responses; an individual hot rock may respond differently from the surrounding ground; conductive salt can add another challenge. Electrical interference and nearby metal may be present at the same time.
Do not diagnose the cause from one symptom. Noise across a broad area, a localized response, or chatter while stationary can each have several explanations. Begin with a repeatable reference check and change one factor at a time.
Minelab’s nugget-detecting guidance illustrates the importance of a usable background response when working mineralized ground. Its EQUINOX-specific settings should not be transferred to other models. The general objective is recognizable signals rather than an impressive sensitivity number.
Ground balance and noise cancel have different jobs
Ground balance reduces the response to local ground; it does not select gold or certify target identity. Noise cancellation addresses certain interference effects. Follow the exact detector’s startup and adjustment instructions instead of combining unrelated procedures.
Choose suitable reference ground away from an unresolved localized response. Complete the prescribed setup, sweep normally, and assess the background. If you move onto different material and operation changes, pause and reassess. Our ground balance guide explains the main distinctions.
| Condition | First comparison | Decision to consider |
|---|---|---|
| Changing mineralized ground | Reference ground versus the new surface | Documented balancing or ground-mode adjustment |
| Loose responsive rocks | Rock separately versus original position, where permitted | Continue investigating without assuming identity |
| Conductive salt or wet saline ground | Supported coil and ground settings | A model-specific configuration change |
| Nearby electrical interference | Noise procedure and a safe alternative position | Interference adjustment before ground changes |
| Physical bumps and cable movement | Contact-free passes and external assembly checks | Correct technique or seek support if unresolved |
Choose stability without suppressing everything
Reducing noise can make searching more productive, but excessive filtering or rejection may also hide desirable responses. Assess each adjustment with a secured, relevant test sample where permitted. A sample check confirms operating behavior; it does not establish a universal detection depth.
The GPX 6000 manual, for example, distinguishes ground settings, tracking, and supported DD functions. Those options belong to that platform. Avoid prescribing them to every machine merely because it is used for prospecting.
5. Improve Coil Control and Target Investigation
Choose a coil you can use effectively
Coil size affects access and coverage as well as potential target response. A compact coil may fit between rocks more easily; a larger coil may suit open ground and certain larger targets. Neither size is automatically superior, and compatibility must be checked for the exact detector.
Before purchasing, compare the gold nugget detectors category and identify the field problem you need to solve. The Minelab gold detectors and Garrett prospecting detectors ranges include options to investigate. Models such as GPX 6000 and Garrett Axiom are examples for comparison, not guarantees of local results.
Keep your coverage controlled
Use a comfortable sweep that maintains a consistent working height and follows the terrain. Avoid lifting the coil at the ends of the arc. Keep forward steps short enough for overlapping coverage, especially around obstacles where apparent coverage can conceal gaps.
There is no universal seconds-per-swing rule. Use the manual and a relevant sample to establish a recognizable response at a controlled pace. Our sweep speed and coil height guide develops this point. Rest when fatigue starts changing your path or attention.
Investigate without claiming a gold sound
Repeat plausible responses with short controlled passes and, where possible, another approach direction. Similar sounds can come from different objects. Target ID, discrimination, and probability displays help with decisions but cannot chemically identify gold.
Where recovery is permitted, separate removed material from the original position and check each independently. A nonmetallic scoop can help isolate a small response. Avoid handling unknown sharp material blindly. Rescan the recovery spot and spoil before restoring the surface.
Beginners benefit from examining a range of plausible responses to learn their machine, rather than rejecting every unfamiliar indication. That does not mean digging hazards, ignoring site rules, or treating every noise as a recoverable target. Record what a response actually proved to be.
6. Advanced Gold Detecting Tips: Make Comparisons You Can Trust
Separate reconnaissance from detailed searching
A broad walk can test access and identify features, but it is not complete coverage. Label reconnaissance separately from systematic lanes in your notes. When an area merits closer work, reduce the block size and finish it before drifting to the next attractive feature.
Give each block a reference and record obstacles, approach direction, time, and unfinished edges. This lets a later visit answer a specific question instead of repeating an undocumented route. Empty blocks are useful evidence only when their search quality is understood.
Change one important variable at a time
If you alter sensitivity, coil, sweep pace, and ground mode together, you cannot tell which change affected the result. Establish a baseline, change one factor, repeat the same check, and record the outcome. Keep the original configuration available for comparison.
For example, compare the same accessible lane using a different compatible coil when your question is obstacle access or response separation. A newly recovered target may reflect better access, approach direction, or earlier incomplete coverage. It does not automatically prove a general depth advantage.
Expand around a verified find
Record the recovery point before moving away. Define manageable adjoining blocks and search them in a documented order. If further verified finds occur, add blocks to investigate their distribution. Do not assume a fixed radius, a straight line, or a particular slope direction from one piece.
Search a promising block from another direction where practical and revisit areas previously obstructed. Changing the approach can improve the investigation, but no number of passes certifies that a patch is exhausted. Describe completed work and remaining limits instead.
Record identity and uncertainty separately
Give every recovered item a find ID linked to coordinates, photographs, and a container. Record positioning accuracy or add a local sketch when needed. Distinguish measured recovery depth from a display estimate, and confirmed gold from a specimen whose identity is still uncertain.
Keep observations separate from explanations. “Three verified pieces recovered from these lanes” is an observation. “A source vein continues uphill” is a hypothesis. Use later recoveries, geological context, and completed coverage to test it rather than placing both statements on equal footing.
For the complete preparation-to-recording sequence, see our natural gold prospecting field guide. This tips article helps prioritize improvements; the field guide provides the full operating workflow.
Keep a reference sample and a reason for every test
A known sample helps you notice when the operating setup has changed, provided you use it consistently. Secure it in an identifiable nonmetallic container, choose a controlled position, and record the coil and settings. Check the empty container first. Retrieve the sample after every comparison and keep it separate from recovered finds so that it cannot become an accidental discovery.
Decide what a test is supposed to answer before starting. If you want to compare coil access, repeat a short obstructed lane. If you want to understand noise, compare the same reference ground before and after one documented adjustment. Moving to a different slope while changing equipment creates several competing explanations. A clear question produces more useful information than a longer but uncontrolled experiment.
Distinguish an empty block from an unfinished block
Before leaving an area without a find, ask whether the search was actually completed. Deep loose cover, inaccessible gaps, noisy operation, and fatigue can leave important limitations. Record those separately from the recovery count. “No gold recovered during a brief reconnaissance” and “no gold recovered from completed lanes with usable operation” describe different evidence and should lead to different return plans.
For example, label three neighboring blocks A, B, and C. If A received complete lanes, B was checked only along its edge, and C was inaccessible, do not shade all three as searched. On the next visit, your first task may be to finish B rather than repeat A. These labels are an illustrative planning tool, not a formula for estimating the amount of gold remaining.
A sensible stopping decision can also be productive. If access, geology, or detector behavior prevents you from testing the original question, record the limitation and reassess the plan. Continuing simply because the site looks promising can consume the day without adding meaningful evidence. Choose a return visit only when you can name what will change: better information, appropriate access, a supported configuration, or a more controlled search.
7. Compare Creeks, Dry Ground, and Beaches
Different environments change both the prospecting question and the equipment requirements. A creek in a documented gold district, a dry wash, and a recreational beach should not be treated as interchangeable destinations.
| Environment | Question to investigate | Main practical limitation |
|---|---|---|
| Creek margins and exposed bedrock | Is there credible coarse-gold evidence and accessible material? | Water access, slippery surfaces, permissions, and equipment water limits |
| Dry washes and shallow slopes | How does surface material relate to the documented occurrence? | Cover depth, variable ground, obstacles, heat, and remoteness |
| Old workings and spoil | What was worked, and is detecting this material permitted? | Metal rubbish, instability, disturbed provenance, and access |
| Natural placer beach | Are natural gold and a detectable size documented locally? | Fine gold, conductive salt, black sand, and changing surfaces |
Separate natural gold from lost jewelry. A popular beach can provide jewelry targets without being a natural-gold deposit, while a beach containing fine placer gold may offer little detectable nugget material. Choose the site and search method for the actual target form.
Check water ratings for the entire setup, not only the coil. Headphones, connectors, control housings, and battery arrangements can have different limits. Follow the model’s instructions, and do not assume that rain resistance permits submersion.
8. Apply These Gold Detecting Tips in a Field Routine
- Define the question. Identify the evidence source, target form, and feature you intend to test.
- Confirm access. Verify permissions and plan navigation, water, communication, and return arrangements.
- Inspect the ground. Compare exposures with your map and note disturbance or unsafe areas.
- Prepare the equipment. Fit a compatible coil and complete the model’s setup on reference ground.
- Search a defined block. Maintain controlled sweeps and record inaccessible sections.
- Investigate plausible responses. Recover only where permitted and identify what caused the signal.
- Document the outcome. Map verified finds, uncertainty, search effort, and settings changes.
- Review before expanding. Decide whether the evidence supports another block, a controlled comparison, or a different site.
Pack light enough to maintain coil control, but retain the essentials for the terrain and conditions. Use headphones at a comfortable level while maintaining awareness of people, traffic, water, and other hazards. Keep communication available; diagnose interference without sacrificing a necessary safety arrangement.
At the end of the session, back up photographs and notes, confirm that your secured test sample is accounted for, and remove rubbish and temporary markers. A useful next-trip plan names a block and a question rather than simply promising to search harder.
Frequently Asked Questions About Gold Detecting Tips
What is the most useful gold detecting tip for beginners?
Start with credible evidence of detectable natural gold and a manageable search area. Learn stable operation and controlled coverage before trying to search an entire district. A suitable site and a repeatable method matter more than an impressive sensitivity setting.
Do contact zones always contain gold?
No. A contact is a boundary between rock units. Some mineralized systems involve contacts or nearby structures, but many boundaries are barren. Learn the local geological association and test it against documented occurrences and verified recoveries.
Does quartz or red soil prove gold is nearby?
No. Both can occur without gold. Treat them as observations requiring geological context, not as material tests. Compare the host rock, structures, weathering, and credible district records before committing to a large search.
Does black sand guarantee a productive detecting site?
No. It may provide heavy-mineral context, but it does not establish detectable gold. The gold could be absent or too fine for your configuration. Evaluate the actual target form and how the ground affects operation.
Should I always use the highest sensitivity?
No. If noise obscures useful responses, the setting is not helping your interpretation. Follow the manual, check reference ground, and compare controlled adjustments. Seek usable operation rather than a universally recommended number.
Can nugget shape tell me where the source is?
Shape can contribute to a geological interpretation, but it cannot determine source direction or travel distance by itself. Combine photographs, recovery positions, terrain, and geological evidence, then test possible directions systematically.
Can old worked ground still contain targets?
It may, but there is no guarantee. Confirm lawful access and assess why targets could remain accessible. Record the configuration and coverage so that a return visit tests a real limitation rather than relying on the site’s reputation.
What makes advanced detecting different from random searching?
Advanced work makes comparisons you can repeat: defined blocks, controlled equipment changes, verified recoveries, and recorded negative results. It produces a clear next decision even when the session yields no gold.